Friday, December 30, 2011

Seeing around the corners

A common sight in Japan are these traffic mirrors.  They allow drivers to see what is around a blind corner.  You see these at intersections or sharp curves where the streets are very narrow, or where a driveway enters the street.

Most of them are round but sometimes they are square.  They vary in size with the round ones appearing to range between 2 and 3 feet in diameter.  They come in doubles or singles, and are almost always mounted on orange posts.

I knew this was something I wanted to have on the modules but could not find any models of them so set out to make my own.
Here's  what I came up mostly from my scrap box parts and a couple hours work.

I used a hole punch to get a disk of .020 styrene, then added a strip of .010 x .040 styrene around about 1/3 of the top edge of the disk.  For the convex shape I used bubbled up flash piece from back of cast resin a vehicle tire.  The pole is .020 brass wire bent at a right angle at the top with the shorter part glued into a hole in the back of the mirror.
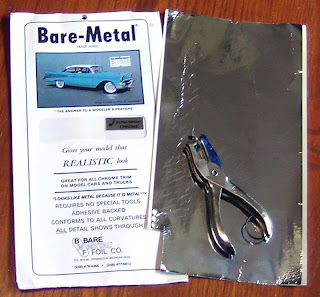
This assembly then got painted Floquil reefer orange. To get the mirror effect I used a product called Bare Metal Foil shown in this photo.  I used the hole punch again to get a matching disk and then installed this over the convex shape of the mirror.


I know I'm going to want more of these mirrors for this and other projects.  The mirror assembly is good candidate for resin castings so the next one is going to be the master for a mold.

Wednesday, December 21, 2011

Finishing the Green Max houses

Back in the February 2011 post A row of Green Max houses I described how I had started to assemble some houses from Green Max kit # 34 to create a residental street scene toward the back of the modules.  A lot of small projects got started during that period that did not get fully finished as I was pushing to get the modules presentable for their first showing that July.  Now I am going back through these and completing them.  Here's how the row of houses came out.

Painting and adding details

There is nothing in English in the instructions on the back of the box but the pictures are good.

Green Max kits are like the American DPM buildings because all the windows and doors are molded on and must be painted by hand.  With patience, you can get some very good results.

Roofs and the separate detail parts can be painted separately then glued onto the building.

Weathering & windows

The separately painted details are added.  I use Bragdon's weathering powers to weather my buildings, using a brush with shortened bristles to make it stiff.  The clear plastic window material that came with the kit is cut to size and attached inside the buildings with Walther Goo. 

Then I draw simulated drapes and blinds on the computer using Microsoft Visio.   These are then cut out and attached to the inside of the windows with Scotch tape.


Completing the scene


So here are the three completed houses mounted on their base, more details added, and then the base mounted on the module. Here are the additional detail parts I used, see if you can find them all.
  • 3 parked bicycles from Gold Metal Models
  • A parked TomyTec car. 
  • 2 cats from Woodland Scenics "Dogs and Cats" set.
  • 2 potted plants from styrene tube and Woodland Scenics field grass.  I have no idea what type of plants these would be.
  • Street light from Kato Dio Town set
  • 3 TV antennas from Gold Metal Models. 
  • Back fence from Green Max kit # 47-7
  • Traffic mirror - scratch built, will be covered in a future post.
It has felt good to get something completed after a bit of a break and I still have more than half of Green Max kit # 34 left to use in future projects.

Thursday, December 15, 2011

Tokyo Train Shopping

In my past trips to Tokyo, I had always visited the Kato Hobby Center near Shinjuku and Tenshodo in Ginza.  This time I wanted to visit some different shops and thanks to information posted on some of the blogs I follow and by members of the Yahoo Groups JR Forum, I was able to find some good shops.  Most were within walking distance of the Akihabara JR Station with one being close to Tokyo Station.  In addition, our friend Tamami took us to a shop in Naka Megruo but that turned out to be an all HO shop.

This is part my haul from visiting about 8 hobby shops.  Most of these items are also available on ebay but I thought I did well on price and of course no shipping charges.  In addition to the items I bought, Tamami gave me several other items so I brought home a good load.

Normally I will purchase a model set of a train we rode on the trip.  This time it was the Kato 7 car set of the E257 Azusa / Kaiji which we had ridden early in this trip.  These were available at most of the shops that I visited but found the best price by far at Hobbyland near Tokyo Station.  This shop only had sets, engines, and cars and no buildings or scenery items.  I got this for 10,500 yen while all of the other places I visited it was 12,000 to 14,800 yen so I was quite happy with this particular purchase.


This is the Hobbyland store near Tokyo Station where I bought my Kato Azusa / Kaiji set.  This photo I pasted from Google Street View which Nona and I find very helpful in finding places in Tokyo.
Here is where to find Hobbyland in relation to Tokyo Station.  It's quite close and is a quick walk if you know right where it's at and don't have to walk around looking for it.


I'd seen the Aoshima parking garage kit on ebay and noticed that they were in most of the hobby shops I visited.  I was impressed with how large these kits are.   Compare here to the stack of Green Max building boxes.

Saturday, December 10, 2011

Rails to trails in Tokyo ?

I had wondered what had happened to the old right of way where the surface tracks of the Tokyu Meguro line had been so on two different mornings I set out on foot to follow it.

This map shows the route I followed over the two days.  The dashed red line on GoogleMaps indicates a subway line.

On the first morning I walked from Musashi-Koyama toward Fudomae.
Closest to the Musashi-Koyama station are some bicycle parking areas


.
During the construction period it seemed that parked bicycles clogged all the approaches to the station so this is an improvement.  It cost 100 yen to park a bike for the day.


I was pleasantly surprised to see that much of the old right of way had been turned into a brick paved walking trail with trees and flowers planted along the sides.  As this photo shows, the space was not very wide.


There were also signs along the way like this one that show where you are at.  I can't read much of it but the drawings of trolleys and track would suggest to me that this used to be a railroad.


Nothing has yet been done with the last portion of the abandoned right-of way just before the Fudome station other than removal of tracks and overhead structures.  This shot is looking toward Fudome.


On another day I walked in the other direction toward Nishi-Koyama.  The pattern of what had been done was similar with bicycle parking areas near the station and then sections of brick walking path.

These homes that had been next to the tracks look very similar to the models offered by Tomix and Green Max.


This is the new subway station at Nishi-Koyama.  Very similar to the one at Musashi-Koyama with the Tokyu food store above.

Saturday, December 3, 2011

Some trains we rode on this trip

Anyone visiting Japan will ride a variety of trains.  These are some of the more notable ones we rode this time.

E257 Azusa Kaiji

While waiting for a Chuo / Sobu local train at Iidabashi station in Tokyo I spotted this colorful train passing through and got this photo.


A few days later we were lucky enough to ride this train from Shinjuku station in Tokyo to Matsumoto in Nagano prefecture.  The E257's are used for limited express service over the Chuo line.  I also saw several of the older 351 series Super Azusa trains were still running on this line.

Many trains in Japan have a train map sign in the space between the cars.  I often get a photo of these for reference and here is the one from this train.  Our train had 11 cars but I understand they sometimes run as 7 or 9 car sets.

700 Shinkansen

We did not buy a JR pass this time so the only Shinkansen we rode this trip was a Kodama service 700 train one way between Nagoya and Shinagawa station in Tokyo.


All the trains I saw running on the Tokaido Shinkansen line were 700's so it looks like these have taken over all services on this line.


205 Series Nambu line

The Nambu line runs between Tachikawa and Kawasaki following the Tama River and crosses the Tokyu Meguro line at Musashi-Koysugi where this photo was taken.


The 205 series has been around since 1984 and has been replaced on most lines that it had run on.  The only lines I saw still running 205's in the Tokyo area were the Nambu & Saikyo lines.


Tokyu 6000 

One of Tokyu's more interesting looking trains, they run on the Tokyu Toyoko line from Shibuya station in Tokyo to Yokohama.  The Toyoko line crosses the Tokyu Meguro line at Den-en-chofu.


Hakone-Tozan 1000

The Hakone-Tozan line is a mountain railroad, with switchbacks and 8% grades climbing over 500m in it's 15km run between Odawara and Gora where this photo was taken.


E231 Series

This type of train is used on a number of lines around Tokyo.  The orange and green stripes mean this one is either a Tokaido Main line or Shonan-Shinjuku line train.  They can be up to 15 cars long including a couple of double decked cars.

Thursday, December 1, 2011

Visiting the prototype

During much of November Nona and I were in Japan and much of that time in Musashi-Koyama.  This was my 4th trip to Japan, and each trip has been unique.  This time I was seeing Japan in a different season than any of my other trips and visited some new places. 

This was the view from our 4th floor hotel room window in Musashi-Koyama looking east at sunset.  The Tokyo Tower can be seen just to the right of the center of this photo.  We were lucky to have a large expanse of shorter buildings to get this view.


It's been awhile since I posted anything on this blog as I had been catching up on DCC installations as well as getting ready for this trip.  I've also been rebuilding one of my 19 year old Ntrak modules.

This is what replaced the old overhead station.  There is a Tokyu food store on the upper levels and an assortment of small shops on the ground level.
The subway station is in the first basement level with entries on each side of the store building and the platforms another level down from there.

I came home from this trip with lots of photos and some new ideas for things to put on the Musashi-Koyama modules and other possible future Japanese themed modules.  In the weeks and months ahead I'll be posting more prototype information as well as further progress on the modules.