Friday, December 30, 2011

Seeing around the corners

A common sight in Japan are these traffic mirrors.  They allow drivers to see what is around a blind corner.  You see these at intersections or sharp curves where the streets are very narrow, or where a driveway enters the street.

Most of them are round but sometimes they are square.  They vary in size with the round ones appearing to range between 2 and 3 feet in diameter.  They come in doubles or singles, and are almost always mounted on orange posts.

I knew this was something I wanted to have on the modules but could not find any models of them so set out to make my own.
Here's  what I came up mostly from my scrap box parts and a couple hours work.

I used a hole punch to get a disk of .020 styrene, then added a strip of .010 x .040 styrene around about 1/3 of the top edge of the disk.  For the convex shape I used bubbled up flash piece from back of cast resin a vehicle tire.  The pole is .020 brass wire bent at a right angle at the top with the shorter part glued into a hole in the back of the mirror.
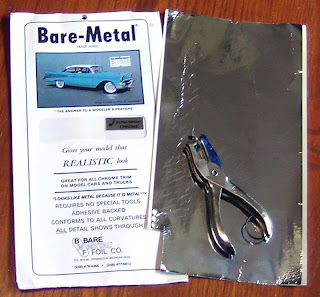
This assembly then got painted Floquil reefer orange. To get the mirror effect I used a product called Bare Metal Foil shown in this photo.  I used the hole punch again to get a matching disk and then installed this over the convex shape of the mirror.


I know I'm going to want more of these mirrors for this and other projects.  The mirror assembly is good candidate for resin castings so the next one is going to be the master for a mold.

Wednesday, December 21, 2011

Finishing the Green Max houses

Back in the February 2011 post A row of Green Max houses I described how I had started to assemble some houses from Green Max kit # 34 to create a residental street scene toward the back of the modules.  A lot of small projects got started during that period that did not get fully finished as I was pushing to get the modules presentable for their first showing that July.  Now I am going back through these and completing them.  Here's how the row of houses came out.

Painting and adding details

There is nothing in English in the instructions on the back of the box but the pictures are good.

Green Max kits are like the American DPM buildings because all the windows and doors are molded on and must be painted by hand.  With patience, you can get some very good results.

Roofs and the separate detail parts can be painted separately then glued onto the building.

Weathering & windows

The separately painted details are added.  I use Bragdon's weathering powers to weather my buildings, using a brush with shortened bristles to make it stiff.  The clear plastic window material that came with the kit is cut to size and attached inside the buildings with Walther Goo. 

Then I draw simulated drapes and blinds on the computer using Microsoft Visio.   These are then cut out and attached to the inside of the windows with Scotch tape.


Completing the scene


So here are the three completed houses mounted on their base, more details added, and then the base mounted on the module. Here are the additional detail parts I used, see if you can find them all.
  • 3 parked bicycles from Gold Metal Models
  • A parked TomyTec car. 
  • 2 cats from Woodland Scenics "Dogs and Cats" set.
  • 2 potted plants from styrene tube and Woodland Scenics field grass.  I have no idea what type of plants these would be.
  • Street light from Kato Dio Town set
  • 3 TV antennas from Gold Metal Models. 
  • Back fence from Green Max kit # 47-7
  • Traffic mirror - scratch built, will be covered in a future post.
It has felt good to get something completed after a bit of a break and I still have more than half of Green Max kit # 34 left to use in future projects.

Thursday, December 15, 2011

Tokyo Train Shopping

In my past trips to Tokyo, I had always visited the Kato Hobby Center near Shinjuku and Tenshodo in Ginza.  This time I wanted to visit some different shops and thanks to information posted on some of the blogs I follow and by members of the Yahoo Groups JR Forum, I was able to find some good shops.  Most were within walking distance of the Akihabara JR Station with one being close to Tokyo Station.  In addition, our friend Tamami took us to a shop in Naka Megruo but that turned out to be an all HO shop.

This is part my haul from visiting about 8 hobby shops.  Most of these items are also available on ebay but I thought I did well on price and of course no shipping charges.  In addition to the items I bought, Tamami gave me several other items so I brought home a good load.

Normally I will purchase a model set of a train we rode on the trip.  This time it was the Kato 7 car set of the E257 Azusa / Kaiji which we had ridden early in this trip.  These were available at most of the shops that I visited but found the best price by far at Hobbyland near Tokyo Station.  This shop only had sets, engines, and cars and no buildings or scenery items.  I got this for 10,500 yen while all of the other places I visited it was 12,000 to 14,800 yen so I was quite happy with this particular purchase.


This is the Hobbyland store near Tokyo Station where I bought my Kato Azusa / Kaiji set.  This photo I pasted from Google Street View which Nona and I find very helpful in finding places in Tokyo.
Here is where to find Hobbyland in relation to Tokyo Station.  It's quite close and is a quick walk if you know right where it's at and don't have to walk around looking for it.


I'd seen the Aoshima parking garage kit on ebay and noticed that they were in most of the hobby shops I visited.  I was impressed with how large these kits are.   Compare here to the stack of Green Max building boxes.

Saturday, December 10, 2011

Rails to trails in Tokyo ?

I had wondered what had happened to the old right of way where the surface tracks of the Tokyu Meguro line had been so on two different mornings I set out on foot to follow it.

This map shows the route I followed over the two days.  The dashed red line on GoogleMaps indicates a subway line.

On the first morning I walked from Musashi-Koyama toward Fudomae.
Closest to the Musashi-Koyama station are some bicycle parking areas


.
During the construction period it seemed that parked bicycles clogged all the approaches to the station so this is an improvement.  It cost 100 yen to park a bike for the day.


I was pleasantly surprised to see that much of the old right of way had been turned into a brick paved walking trail with trees and flowers planted along the sides.  As this photo shows, the space was not very wide.


There were also signs along the way like this one that show where you are at.  I can't read much of it but the drawings of trolleys and track would suggest to me that this used to be a railroad.


Nothing has yet been done with the last portion of the abandoned right-of way just before the Fudome station other than removal of tracks and overhead structures.  This shot is looking toward Fudome.


On another day I walked in the other direction toward Nishi-Koyama.  The pattern of what had been done was similar with bicycle parking areas near the station and then sections of brick walking path.

These homes that had been next to the tracks look very similar to the models offered by Tomix and Green Max.


This is the new subway station at Nishi-Koyama.  Very similar to the one at Musashi-Koyama with the Tokyu food store above.

Saturday, December 3, 2011

Some trains we rode on this trip

Anyone visiting Japan will ride a variety of trains.  These are some of the more notable ones we rode this time.

E257 Azusa Kaiji

While waiting for a Chuo / Sobu local train at Iidabashi station in Tokyo I spotted this colorful train passing through and got this photo.


A few days later we were lucky enough to ride this train from Shinjuku station in Tokyo to Matsumoto in Nagano prefecture.  The E257's are used for limited express service over the Chuo line.  I also saw several of the older 351 series Super Azusa trains were still running on this line.

Many trains in Japan have a train map sign in the space between the cars.  I often get a photo of these for reference and here is the one from this train.  Our train had 11 cars but I understand they sometimes run as 7 or 9 car sets.

700 Shinkansen

We did not buy a JR pass this time so the only Shinkansen we rode this trip was a Kodama service 700 train one way between Nagoya and Shinagawa station in Tokyo.


All the trains I saw running on the Tokaido Shinkansen line were 700's so it looks like these have taken over all services on this line.


205 Series Nambu line

The Nambu line runs between Tachikawa and Kawasaki following the Tama River and crosses the Tokyu Meguro line at Musashi-Koysugi where this photo was taken.


The 205 series has been around since 1984 and has been replaced on most lines that it had run on.  The only lines I saw still running 205's in the Tokyo area were the Nambu & Saikyo lines.


Tokyu 6000 

One of Tokyu's more interesting looking trains, they run on the Tokyu Toyoko line from Shibuya station in Tokyo to Yokohama.  The Toyoko line crosses the Tokyu Meguro line at Den-en-chofu.


Hakone-Tozan 1000

The Hakone-Tozan line is a mountain railroad, with switchbacks and 8% grades climbing over 500m in it's 15km run between Odawara and Gora where this photo was taken.


E231 Series

This type of train is used on a number of lines around Tokyo.  The orange and green stripes mean this one is either a Tokaido Main line or Shonan-Shinjuku line train.  They can be up to 15 cars long including a couple of double decked cars.

Thursday, December 1, 2011

Visiting the prototype

During much of November Nona and I were in Japan and much of that time in Musashi-Koyama.  This was my 4th trip to Japan, and each trip has been unique.  This time I was seeing Japan in a different season than any of my other trips and visited some new places. 

This was the view from our 4th floor hotel room window in Musashi-Koyama looking east at sunset.  The Tokyo Tower can be seen just to the right of the center of this photo.  We were lucky to have a large expanse of shorter buildings to get this view.


It's been awhile since I posted anything on this blog as I had been catching up on DCC installations as well as getting ready for this trip.  I've also been rebuilding one of my 19 year old Ntrak modules.

This is what replaced the old overhead station.  There is a Tokyu food store on the upper levels and an assortment of small shops on the ground level.
The subway station is in the first basement level with entries on each side of the store building and the platforms another level down from there.

I came home from this trip with lots of photos and some new ideas for things to put on the Musashi-Koyama modules and other possible future Japanese themed modules.  In the weeks and months ahead I'll be posting more prototype information as well as further progress on the modules.

Sunday, September 11, 2011

You can never have too many people

When your N scale model railroad is Tokyo you need lots of N scale people.

Adding people and creating little scenes that tell a story have always been enjoyable to me.  Modeling passenger trains and stations in Japan means more opportunity to do this.

There is a wide variety of N Scale Japanese people sets available from Kato and Tomytec.  


I purposely created a walkway area along part of the front of the module connecting one of the station entrances to the street as a place to display some people.


The food vendors are from the Kato lunch vendors, set # 24-262.  The other figures are walking passengers from various sets.


I've tried two different adhesives to attach N scale people.  The Accent Glue from Woodland Scenics works great on a stationary layout.  It comes a brush attached to the lid.

On modules I've had the best results with Walthers Goo.  Use a toothpick or bamboo skewer to apply a small amount.

So far I have about 50 people on the modules, most of those on the station platform.  As I add more and create some little scenes, I will present them in future posts.

Thursday, July 21, 2011

The Emperor's Train

Another friend from Peninsula Ntrak who collects Japanese trains is Richard Porter.

Here is Richard running his Kato model of the Japanese Emperor's special train on the AsiaNrail layout.


The train is shown here passing Paul's model of the Byodoin Temple Phoenix Hall.

He built this from a Fujimi kit.  The real one is in Kyoto and there is also a full sized replica in Hawaii.


Perhaps the Temple looks familiar even if you've never been there.  That's because the replica on Oahu's north shore is a favorite filming location and has been featured in the TV shows Hawaii Five-0, Magnum, PI, and Lost, and in the movie Pearl Harbor.


In this last view of the train the E58 locomotive is disappearing behind the banana trees on one of the more tropical areas of the AsiaNrail layout.

Wednesday, July 13, 2011

First Exhibition

July 8th, 9th, and 10th the Musashi-Koyama modules were part of the AsiaNrail layout at the 2011 NMRA National Train Show in Sacramento, California.  Over the 3 days the show was attended by more than 20,000 people.

Besides my 2 modules, all of the other modules were done by Paul Ingraham.  We were assisted with the setup of the layout and at various times the operation of it by Tom VanHorn, Phillip Cook, Richard Porter, and Mike Sheridan.

The layout consisted of several of Paul's junction and curved modules forming a irregular circle and 4 peninsulas going off from this covering an overall area of 20 x 20 feet. 


The 4 peninsulas represented Tokyo (my modules), Taiwan, South Korea, and a undecorated staging yard.


Here is a view of one of Paul's trains leaving Musashi-Koyama station.  Hopefully before the next showing of these modules I will get the grade crossings installed !

Independent from the main line operation we had a point to point passenger operation between the Tokyo and South Korea peninsulas using a wide variety of trains.  Here is a Super Ozora 283 train at the Musashi-Koyama platform.
We were joined by Phillip Cook of the Japan Rail Modelers of Washington DC.  He brought with him a nice selection of short passenger trains to run. Here he is operating the yard on the South Korea module which served as the other end of the point to point operation.
Everything worked well on the Musashi-Koyama modules and the trains ran smoothly.  A point did come loose on one of the Micro Engineering turnouts but I was quickly able to repair it.  I do consider this first outing for these modules to have been a great success and will be continuing to build the scenery for them and look forward to future exhibitions.

Tuesday, July 5, 2011

Ready to go !

The months of preparation leading up to the National Train Show have passed and it's time to actually display the Musashi-Koyama modules and run some trains !

Here is the module set assembled in my garage just prior to loading it for the trip to Sacramento.

There is still so much that I still want to do with buildings and details, and work on the modules will continue after this show prehaps at a somewhat slower pace.


If you are going to the show, look for the AsiaN Rail layout in area 813 which is right in the middle. 

Hours:  12:00pm to 6:00pm Friday, July 8th
            10:00am to 6:00pm Saturday, July 9th
            10:00am to 5:00pm Sunday, July 10th

Location:  2011 NMRA National Train Show
                Sacramento Convention Center
                1400 J Street
                Sacramento, California

Monday, July 4, 2011

Movable track bumpers

June came and went with only one post to this blog.  Part of the month Nona and I drove to the Dallas, Texas area to pick up a travel trailer that we had purchased.

Over this 4th of July weekend I have been making final preparations to take these modules for their first exhibition in Sacramento as part of the AsiaNrail layout. On Friday, I took the modules over the Paul Ingrahams place as he had most of the rest of the layout set up in his garage and we wanted to work out any bugs with getting the Musashi-Koyama modules into the layout ahead of time.  I am happy to say that any problems were small and have already been solved.

The modules can be used in a number of different ways and for this layout this is going to be an end of line terminal station.  The last thing one wants to the have a train overshoot the end of the line and fall several hundred scale feet to the floor !  So I needed to come up with some track bumpers.

What I came up with was to shape scrapes of 1/2 inch plywood and painting them a concrete color.  Then I drilled a pair of 1/8 inch holes and inserted 1/8 inch styrene tubes with Walthers Goo to secure secure them.
From the same pattern used to drill the holes in the bumpers, Holes are drilled on the center line of the roadbeds at each end of the module.  When this end of the module connects to another part of the AsiaNrail layout, the holes will be covered by connecting tracks.

Styrene strip was painted black, and then attached to the flat side of the bumpers.  Then some safety striping was cut from a sticker set and applied to the styrene.  These can now be moved to wherever they are needed depending on the use of the modules in a layout.

Saturday, June 18, 2011

Modeling the overhead wires

Nearly all rail lines in the Tokyo area are electric.  The overhead wire support structures are in evidence in any photo of trains in Tokyo so I felt that this would be an important item to have on these modules.  This photo shows an extreme example of this.


Here is another look at my reference photo that was in last falls Streets and Buildings post.  A clear view of one of the overhead wire support structures is shown.


What I found to be the closest match to this were the Tomix 3000 series.  I used 1 set of the 3004 ( set of six 2 track ) and 2 sets of the 3005 ( set of three 3 track ) to get full set of 8 overhead wire support structures which are spaced at every 80 - 100 scale feet on the modules with spares of each of the three widths that I ended up with.


Middle insulators were removed on the 3 track versions.


On two of them a section in the center was removed and the two sides spliced to match track spacing.  These overhead wire structure models are made of the same type of plastic that many locomotive handrails are made of.  It is very difficult to glue together.  I found that I got the best results by placing a .010 thickness of styrene between the two halves.  I also laminated a .020 thickness of styrene on the top to add strength.


The kits come with horizontal cross members that attach to vertical poles.  There are notches on the cross members that hook into slots that go around the uprights.  I wanted some reinforcement to this so I added a bead of Walthers Goo.


Each set of Tomix overhead wire structures comes with a spue of mounts that were designed to work with the Tomix track.  I used these to make my own mounts.  The styrene tubing extends down into holes that I drilled into the modules and up to a height of 2 -3 scale feet.  When completed and placed on the modules, the bases will be painted the finished assemblies a concrete color.


The mounting bases were glued into drilled holes on both sides of the tracks.  Height adjustments were made so that the structures would be fairly level as shown in the photo.


Here is a view of the structures after painting along with a 651 Series Super Hitachi train.   The overhead wire support structures plug into the mounts but can be easily removed if needed for track maintenance.