

Sunday, July 31, 2016
Basic layout of expansion module
After experimenting for a few days with placement of features on the extension module the photo below shows what I decided on. This layout is freelanced but based on some features that do exist at this location. There is a wider street, that intersection has traffic signals but the intersection is 4 way. There is a small Tokyo Police Box (station) on this street which is a two story building. When the surface rail line was in service there was an electrical sub-station next to the tracks and the Police station was in a slightly different location and was a small one story building.
 The seam between the two modules is at the top of the darker road surface. As there has been good results using a joiner-less track connection on the Hot Springs Junction Ntrak module I am trying that out again here with two tracks.
Sunday, July 24, 2016
Modeling Japanese Buses
As great as the passenger rail systems are in Japan, there are also a great many buses. It makes sense as there are going to be places where the trains don't go and a connection can be made by bus. Bus stops are often just outside a train station and can easily be included in a modeled scene. Lucky for us modelers that TomyTec offers some great models of Japanese buses. Below are examples of three basic types.
 Bus tours are very popular in Japan and this is a model of a Japanese tour bus. There are many companies that run these tours and some of the buses are quite colorful.
 There are trains that go to the airport but another option if you have a lot of luggage is an airport shuttle bus. These make stops at many of the major Tokyo hotels and several of the train stations.
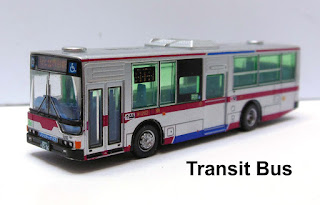 This is a model of a typical city transit bus. They are smaller than American transit buses and less luxurious than the Japanese tour and airport shuttle buses. The same Suica card used for the trains also works to pay for a bus ride.
 All of these bus models have fantastic details both inside and out. Even the license plates are readable. This one is from Shinagawa-ku which is the same general area of Tokyo where Musashi-Koyama is located.
The transit bus body can also be used with a motorized chassis to work with the TomyTec Moving Bus System.
 This is the package that the transit bus comes in. Included in the package are some bus stop signs. The tour and airport shuttle buses come in a cardboard box.
The transit bus was given to me as a gift and I will be using it along with some bus stop shelters that were also a gift on the new extension of the Musashi-Koyama modules .


The transit bus body can also be used with a motorized chassis to work with the TomyTec Moving Bus System.

The transit bus was given to me as a gift and I will be using it along with some bus stop shelters that were also a gift on the new extension of the Musashi-Koyama modules .
Wednesday, July 20, 2016
Difference between a yard and a meter
When I started building the Musashi-Koyama module set in 2010 I tried to follow the AsiaNrail specifications carefully. Everything in the AsiaNrail standard is metric, track spacing, track set back from the modules edge, etc. The one thing I had overlooked was the dimension of the module frame. I built a pair of modules 36 x 18 inches !
The depth of the module is no big deal but the length is. This module set has been in several shows now and the way we have worked around it has been to use it as an end terminal on a branch line. That's OK but it would be great to get it into the loop part of the layout and Paul has a nice 2 meter long staging yard that would match the length on the opposite side of a loop if this module set were the correct length.
It seemed like the best way to correct the problem would be to build another small module that could be attached to one end and bring the length of the set up to 2 full meters. The length of the module would need to be 6 - 3/4 inches and the depth could be anything up to the 14 inch depth of the main modules.
 So I built this small extension that can be attached to the right end of the pair of modules. It is 6-3/4 inches wide and with it added the module set will be a full 2 meters.
 With the top and bottom sealed and cork roadbed in place I am now mulling over what to do for scenery on this extension. I do have a number of items already that will fit in well.
Anyone who has built a display layout or modules knows one of the biggest motivators to getting things done is having a show to take the layout to. Because of schedule conflicts I have not had the opportunity to have modules in an AsiaNrail layout for almost 2 years and have been working on an American prototype home layout instead. It is now planned for there to be a joint Ntrak / AsiaNrail layout at the Los Altos Train Day event on September 17th and 18th so I am motivated to finish this new small module and perhaps get some for scenery done on the main modules.
The depth of the module is no big deal but the length is. This module set has been in several shows now and the way we have worked around it has been to use it as an end terminal on a branch line. That's OK but it would be great to get it into the loop part of the layout and Paul has a nice 2 meter long staging yard that would match the length on the opposite side of a loop if this module set were the correct length.
It seemed like the best way to correct the problem would be to build another small module that could be attached to one end and bring the length of the set up to 2 full meters. The length of the module would need to be 6 - 3/4 inches and the depth could be anything up to the 14 inch depth of the main modules.


Anyone who has built a display layout or modules knows one of the biggest motivators to getting things done is having a show to take the layout to. Because of schedule conflicts I have not had the opportunity to have modules in an AsiaNrail layout for almost 2 years and have been working on an American prototype home layout instead. It is now planned for there to be a joint Ntrak / AsiaNrail layout at the Los Altos Train Day event on September 17th and 18th so I am motivated to finish this new small module and perhaps get some for scenery done on the main modules.
Wednesday, July 13, 2016
Adjustable height leg system
To make the height of the track correct so that the AsiaNrail layout can interchange with an Ntrak layout Mountain Division track using the Hot Springs Junction Ntrak module, the AsiaNrail layout has to be lowered from 51 to 43 inches. Back in the fall of 2014 we did a layout exhibition using this configuration which included for the first time the Musashi-Koyama modules and at the time I simply shortened the legs. All of Paul's AsiaNrail modules have adjustable legs and that's what I need to have for the Musashi-Koyama modules as well.
 When I had shortened the leg assemblies to 40 inches I had to make new top cross boards. Those boards never got painted as I knew I would need to someday make the height setting adjustable to use the modules at the 51 inch height again.
This is what the leg assemblies looked like after I had done that first modification. Now I am cutting again at the locations shown in this photo.
 A new pair of legs was added to the upper section inside of the cut off sections of legs that remained at the edges of the top cross boards. 1/4 inch thick plywood strips were added to one side of each leg so that when put together the legs are sandwiched in between. 10-24 bolts and tee nuts are used to hold the leg at one of two different heights.
 Here is a photo of one of the completed leg assemblies set in the lower position. A leg height of 40 inches will set the track height at 43 inches with the screws at the bottom of the legs at about halfway in their 2-1/2 inch adjustment range.
The black parts are the original structure and the unpainted parts are new material. When finished everything was repainted with a black enamel.
 Here is the same leg assembly set at the 48 inch height. This sets the track level at 51 inches. Some modifications were also made to how these legs go together in their stored mode for transport.
With the experience of modifying this set of legs I will be building an entire new set of legs for the Hot Springs Junction Ntrak module. I currently have two 4 foot Ntrak modules but only one set of legs. An adjustable leg set for the Hot Springs Junction module will allow it to be used in either an Ntrak layout or in an AsiaNrail layout. It will also allow me to have both of my Ntrak modules in a layout at the same time.

This is what the leg assemblies looked like after I had done that first modification. Now I am cutting again at the locations shown in this photo.


The black parts are the original structure and the unpainted parts are new material. When finished everything was repainted with a black enamel.

With the experience of modifying this set of legs I will be building an entire new set of legs for the Hot Springs Junction Ntrak module. I currently have two 4 foot Ntrak modules but only one set of legs. An adjustable leg set for the Hot Springs Junction module will allow it to be used in either an Ntrak layout or in an AsiaNrail layout. It will also allow me to have both of my Ntrak modules in a layout at the same time.
Subscribe to:
Posts (Atom)