Showing posts with label Musashi-Koyama modules. Show all posts

Saturday, March 8, 2025

The Tomix Pachinko Building - Part 2

After finishing how the lighting was going to work I moved on to finishing the interior detail.  The kit included 4 rows of pachinko machines and 8 rows of seats.  These were removable from the base but were made of a type of plastic that did not take paint very well so I had to spray them with an adhersion promoter before painting.  I had a bag of background quality figures and about half the seats got  occupants after their legs were cut off. 


The kit included stickers for pachinko machines and other interior surfaces that were part of the base.  A few more standing figures were also added.


The roof normally sits loosely over the original battery compartment.  To hold this roof on but have it still be removable, I glued a small magnet to a scrap of .030 styrene sheet and then taped that over the walls of the battery compartment.


Then a scrap of steel starping was glued to the inside of the roof with E-6000 adhesive.


The entire inside and outside of the building got painted.  The building itself was already glued together so I just had to paint it carefully by hand.  The outside of the building also got a bit of light weathering using detail wash with the roof section getting a little heavier treatment.


The railings that came with the kit were painted and installed on the sidewalk section and a few more figures were placed outside the building.  


Saturday, March 1, 2025

The Tomix Pachinko building- Part 1

Years ago I found this Tomix building at a local train show for 10 dollars and when I built these modules I found it easy to fill in an empty space with it.  It already had some unpainted interior details so I thought some day I would like to finish this structure and light the inside.  That day has finally come.


Tomix buildings like these often come with a nice sidewalk section that interlocks with the structure base.  This set had this front sidewalk plus another section for a parking lot in the back.  When I first installed this on the module there was no room for the sidewalk so I left it off.  Now that the modules are developed further, I decided to use the sidewalk so I cut the parking lot section to fit and moved the structure back just a bit.


This building has a sign in the front that lights with 3 LED's connected to a circuit that makes them flash in sequence.  The light was barely visible through the sign and I had considered replacing it with something else.  What I discovered was that the LED's were positioned too far behind the sign for the light to be effective.  I found that if I fitted styrene tubing over the LED's the light was more focused so decided to keep the sign. 


I built a small 3 volt regulator circuit to replace the pair of AA batteries that had been powering the sign.  The load is very small but I still added a heat sink and did a 24 hour test to be sure this circuit would stay cool.


To light up the interior of the first floor I made a ceiling out of .030 styrene sheet and glued it to the existing plastic piece that holds the lighted sign and front doors and windows in place.  5 surface mount LED's were inserted through holes in the ceiling and scraps of decoder wires were used to connect them to a PC board from a Kato GP50.  This was also something left over from a decoder installation.  These will run on the 12 volt DC power circuit with a current limiting resistor.  The photo below shows the top side of this ceiling.


To be continued .......

Sunday, February 23, 2025

Finishing the Palm shopping arcade

The Musashi-Koyama Palm shopping arcade is a one of the main features of my module set.  While it was one of the first things started on these modules back in 2011, it has never been finished.   For the past several weeks I've been going through the modules and finishing things area by area.  It's now time to finish the Palm shopping arcade.


A pair of Tomix corner buildings form the entrance to the Palm Arcade.  The finishing of one of these was covered in detail in the previous post.  This second one is modeled after some businesses that are still there and I could use those as a reference, creating some similar signs to those that are actually there.  The first floor of this building is a bakery and the second floor is a pawn shop.


The flooring for the arcade was created using Microsoft Visio.  Patterns of tiles were copied from those seen on Google street view images.  The patterns were made smaller and closer together toward the back to suggest a force perspective in the scene. This took quite a bit of trail and error before I got it right and it fit into the unusual shape.  The final printout was sealed with glossy packaging tape to give it some shine.


The original printed image on the back wall was from a photo I had taken.  After test fitting the cover I was not satisfied with how well it looked with the floor so I found a better one on Google street view.  This also took many attempts to get it into the right size and position.  Then a photo of the front of a Diaso store was pasted along the wall on the right side.  There is actually a Diaso store within the Palm Arcade but it's in a different location.   A pair of LED light boards from Atlas locomotives that were left over from decoder installations were used to illuminate the inside of the arcade.

Before re-installing the structure that included the roof, I added some figures.  I found that the canopy glue that I have been using to stick figures down was not holding as well on the glossy tape surface of the tile floor to instead went back to using E6000 adhesive for this job. 


Here is the finished scene.  The actual location goes on for over 2000 feet but my model is only 5 inches deep.


Sunday, February 16, 2025

Finishing a Tomix corner building

This Tomix corner building is one of a pair that I modified about 14 years ago to form the entry of the Musashi-Koyama Palm shopping arcade.  They along with the rest of the arcade structures have been sitting on the module all this time with a primer gray color while I worked on other areas of the modules.  The photo below shows how it looks with the other structures removed.  The modifications to this structure had been that part of it on the left side had been removed to make it fit in the space available and the windows had been covered with a styrene siding.


Up until the late 2000's, the actual location that this model is based on had been a yakitori chicken place.  That's long gone now but I wanted it in my representation of the area as it was in the 1990's.  I recalled noticing what seemed to be a take out counter and my wife remembers it having both take out or eat in options.  So leaving out the clear plastic front door insert, I made a counter and back wall attached to the base.


And here it is with the building re-installed to see that everything still fits OK.  I plan to add lighting over the counter area and some detail as well.  The opening to the right of the counter will be the entrance to the restaurant.


To light the area of the take out counter I used 2 surface mount LED's glued to a piece of clear window material left over from a kit and dulled with sandpaper to defuse the light.  The LED's were connected to a leftover board from an Atlas locomotive to use it's current limiting resistor. Scraps of decoder wire were used to connect the LED's to the board then 22 gauge wire was soldered to the inputs of the board to connect it to the 12 volt DC buss under the module.


A sign was created for this business and attached to a sign board that was in my stash of parts.  The sign board and exterior trim was painted yellow and the visible interior walls were painted a darker yellow.  Some menu board images from the internet were shrunken down to side and pasted to the wall behind the counter.  In these last two photos it will be noticed that tile flooring has been added.  How I did this will be covered in a future post.


To finish this building the visible exterior walls were painted white and the roof received some 3D printed details.  Then the roof received some black weathering wash which really brings out the detail on the items on the roof.


Monday, February 10, 2025

Finishing a Green Max office building

On the small extension module I added to one end of the Musashi-Koyama modules to make the set 2 meters long, I have a kit bashed Green Max building from set 46-7 that I never finished.  Coming off the completion of the Kato building, I feel now is the time to tackle this building.


The building is separate from the styrene base and both are held in place on the module with a single 4-40 screw.  The building first got 2 coats of a pale blue color.  It was my first time using Vallejo paint in my air brush and it worked out well after thinning the paint a bit with distilled water.  I'll be using more Vallejo paints in the future.


One of the ground floor entry pieces was installed on the first floor after the trims and door handle were painted with a silver Sharpie pen.  The roof, base, elevator tower door, and awning were all hand painted, and one of the stickers from the set was installed above the ground floor making that floor a bank.  The tenants of the building will be in the financial services industries except for the 2nd floor which will be restaurant.  I painted the window frames on the 2nd floor gold. 


The Green Max building kits don't come with window glazing but include sheets of clear plastic that can be cut and glued to the interior walls.  I used canopy glue to do this.  This particular building was modified to fit in the space and the back wall was left off as it would not be seen once the building is on the module.  This made it easy to access the inside of the building.


The side of the elevator tower got some paper signs that I made on the computer.  The second floor restaurant is a izakaya serving tako which in English is grilled octopus.  The billboard is an advertisement for some sort of fruit yogurt drink.   

Two of the vertical signs from the kit were modified and placed on the corner of the building, a stock broker on the 5th floor and an insurance office on the 3rd.  A real estate office occupies the 4th floor and uses the small sign board.  All of there signs are stickers from the kit.


Wednesday, February 5, 2025

Finishing the grade crossing scene

In a previous post, I had described the modification and installation of a set of TomyTec grade crossing signals and gates.  In this post I want to describe the finishing of the scene as a whole.  As a starting point, here again is the overhead photo of the scene as it has been for the past couple of years.  There is a removable catenary wire structure that has been removed while I do this work.


And here is the same scene after I had finished with the crossing gates.  I added yellow border stripes to the pedestrian crossing and removed the white stripe across the road on the side closest to the front edge of the module as it was not in the correct spot in relation to the gate.  As I had some gray paint out to paint the border around that removable gate, I also painted the sidewalks closest to the front edge and the support structures on all of the signals. 

And here is the finished scene.  The sidewalk and all of the gray parts on the signals have been weathered to better represent concrete.  The ballast and turf scenery has been touched up around the closest crossing gate and other spots as needed.  A new white stripe near the closest gate has been added, and several figures have been placed in the scene.  


One of the figures is this 3 wheeled delivery vehicle from a TomyTec set which are so common in Tokyo.  This and the other figures were attached with canopy glue.  I like to not glue down most vehicles so I can arrange them when setting up the modules.  


Saturday, February 1, 2025

Installing TomyTec crossing gates

On the small extension module that I built to make the Musashi-Koyama module set a full 2 meters long there was this grade crossing that had never been fully finished.

While shopping during our recent trip to Japan I saw this Tomytec set and thought it would be just the thing for this unfinished grade crossing as it had the signals for a separate pedestrian crossing just like in the scene on my module.


This is all the parts to the set after I had installed the crossing arms.  The pavement parts I won't be needing for this project so they will be put away for some future use.  The gate arms are separate pieces and in this photo I have already installed them.  They can be set in either an up or down position. 

These crossing gates are intended to be installed below the level of the cork roadbed and it was necessary to make some modification to have the grossing gate arm at a more realistic level when down.  I ran into the same issue with the Green Max gates on the 1st crossing and covered that in THIS POST.  For the gate on one side of the street I cut down the height of the base as shown here so it could be glued down to the existing scenery.

On the other side of the street things are a bit more complicated.  The gate will actually be on another module as the edge of the street is where the seam is between the modules.  For this gate I cut an opening in the cork that the base could fit into and attached a small magnet to the inside of the base with E6000 adhesive.  


And here are all of the gates and signals installed on the module.  On the 3 that are not held by a magnet I used E6000 adhesive to attach them to the existing base.   Of course there is more I need to do to finish this scene and I will cover that in a future post.


Monday, January 27, 2025

Finishing a Kato office building

I know, long time no post.  I've been keeping busy with my American theme home layout but with another 5 day long exhibit of the AsiaNrail layout coming up at Hiller Aviation Museum in April I wanted to finish a few more things on the modules.

This Kato office building was one of the first Japanese buildings I bought back around 2009 but never finished.  A couple of years ago I did get around to painting it to get rid of the plastic look.  Now I want to get rid of the vacant look.

The Kato part number is 23-435 and they are still available.  These buildings are particularly well designed, have interior walls, and can be easily made taller or shorter 2 floors at a time.  I'm leaving this one at it's stock 6 floor height.


I decided that I wanted to light and detail the lowest 2 floors.  The ground floor was going to be a convenience store and the base already had detail for a restaurant so I cut that off with a hack saw. 


The base got a new floor and wall arrangement to resemble a small convenience store.  Shelves and counter were made from scraps of styrene and printouts of on line photos pasted to the shelves. 


The 2nd floor was going to be a pizza restaurant and the interior for that was built on the existing 2nd floor insert that is part of the kit.  Most of the fixtures were scratch built and the chairs came from a Pieser set. 


The upper floors windows got blinds printed out on paper, taped to the inside of the windows and set at various heights.  The upper floors businesses include a music school,  an optometrists,  a language school, and a dental clinic.  The signs were created using Google translate, then copying the Japanese text into Microsoft Visio where it can be edited for size and color.  Background color and any graphics are also added then printed out on plain paper.  Glossy package tape was used to give the signs some shine then they were pasted on styrene strip.


Here is a closeup of the floors with interior detail.  Two surface mount LEDs were used on each floor.  The restaurant has warm spectrum LEDs and the convenience store has white LEDs.


Here is the completed building back on the module.  I added that billboard sign on the side of the building from a image I found on the internet.  The type of glue featured in the ad is the same as what I used to paste some of the paper parts of this project.

The vertical signs on the front of the building were made the same way as the signs that are above each window then pasted to each side of a strip of styrene.


Thursday, March 23, 2023

Getting ready for the next show

Back after a month in Japan and only 3 weeks before our next layout setup at the Hiller Aviation Museum as mentioned in the last post.  In this layout I will be displaying all of my Japanese modules.  The Hot Springs Junction and the pair of 45 degree modules were all checked out before we left for Japan and are ready to go.  Between now and the show I am checking out the Musashi-Koyama set of modules.  The modules came through the long period of storage just fine and only needed the track to be cleaned.

With each setup I try to have a little something more finished on the modules.  Over the next couple of weeks I plan to finish a Kato Diotown building that has been sitting on the module unfinished since it's beginning in 2011.

Here's the building in pieces as it sits on my work bench.   Right now going through all the stickers I have and figuring out what types of businesses will occupy it.


I also plan to work on some more street signage and add some more people that I purchased while in Japan.

Tuesday, September 10, 2019

Report from the Narrow Gauge Convention

Last week was the 39th annual National Narrow Gauge Convention in Sacramento where we had our biggest yet AsiaNrail layout.  This was a great, well organized convention which included contest room, 2 vendor rooms, many clinics, and of course a large layout room.


In the layout room besides our AsiaNrail layout there were several other really great layouts in several scales, all narrow gauge.

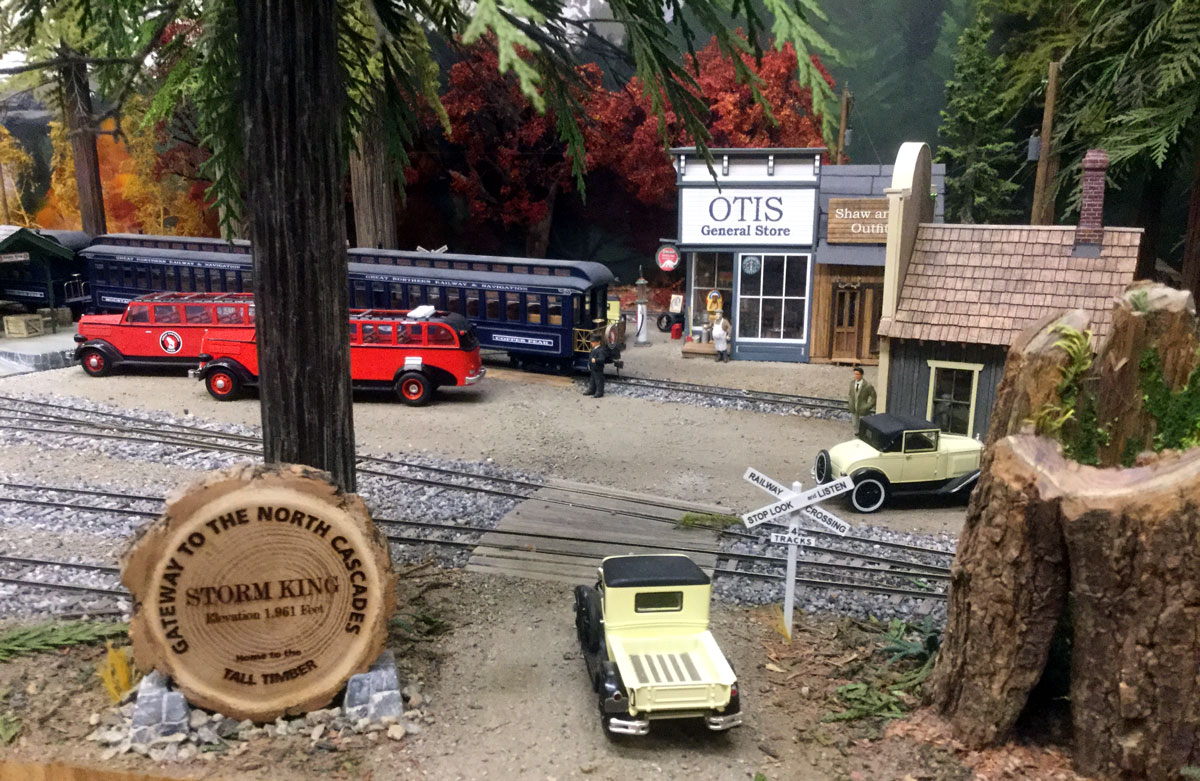
Just one example is this great scene is from an On30 layout called "Storm King".


One nice feature of this convention was that the layout and vendor rooms were opened from 8:00am to noon and from 6:00pm to 10:00pm.  So everyone got a chance to get out in the afternoons to the California State Railroad museum and to the many home and club layouts that were on a self guided tour.  Our crew visited 9 layouts including 2 garden railways.  While I have seen many G scale modular layouts at shows and a few at botanical gardens, this was the first time I had ever seen one in some ones yard and can see why it has become so popular.

This is an overall view of our layout.  It was a triangle of 2+ meters on each side with Paul's wye module in the foreground feeding long branch and the 4 way junction feeding a pair of short branches.  We set the layout at the 51 inch height.

My new highway module was part of the long branch line.  With the magnets holding the vehicles on the highway I was able to put different vehicles on the highway every day.


Paul has also been working on some new modules.  With this new port module we now have inter-modal operations including a container crane and Kato container trailers.

For this new port module Paul came up with a way to make the water that I had never seen before.  He used obscured acrylic sheet bumpy side up with smooth color sheet on the bottom.


Paul has also been working on a car card traffic system for the layout and built some card boxes with a clever little table that folds out.  Here he is explaining to the crew how the system works.

Sam did not have his new module ready for this show but still made the trip up from the Los Angeles area and brought a nice table top display of items including an old steel herald from the front of a Japanese passenger train.


This was another successful outing for the modules.   I don't get to as many N scale conventions as I would like and after attending this narrow gauge convention I know I will attend others in the future.  It gives me more options to attend an event without too much traveling.  I may even be interested in attending a garden railway convention if it's close by.