Showing posts with label TomyTec. Show all posts

Wednesday, February 5, 2025

Finishing the grade crossing scene

In a previous post, I had described the modification and installation of a set of TomyTec grade crossing signals and gates.  In this post I want to describe the finishing of the scene as a whole.  As a starting point, here again is the overhead photo of the scene as it has been for the past couple of years.  There is a removable catenary wire structure that has been removed while I do this work.


And here is the same scene after I had finished with the crossing gates.  I added yellow border stripes to the pedestrian crossing and removed the white stripe across the road on the side closest to the front edge of the module as it was not in the correct spot in relation to the gate.  As I had some gray paint out to paint the border around that removable gate, I also painted the sidewalks closest to the front edge and the support structures on all of the signals. 

And here is the finished scene.  The sidewalk and all of the gray parts on the signals have been weathered to better represent concrete.  The ballast and turf scenery has been touched up around the closest crossing gate and other spots as needed.  A new white stripe near the closest gate has been added, and several figures have been placed in the scene.  


One of the figures is this 3 wheeled delivery vehicle from a TomyTec set which are so common in Tokyo.  This and the other figures were attached with canopy glue.  I like to not glue down most vehicles so I can arrange them when setting up the modules.  


Saturday, February 1, 2025

Installing TomyTec crossing gates

On the small extension module that I built to make the Musashi-Koyama module set a full 2 meters long there was this grade crossing that had never been fully finished.

While shopping during our recent trip to Japan I saw this Tomytec set and thought it would be just the thing for this unfinished grade crossing as it had the signals for a separate pedestrian crossing just like in the scene on my module.


This is all the parts to the set after I had installed the crossing arms.  The pavement parts I won't be needing for this project so they will be put away for some future use.  The gate arms are separate pieces and in this photo I have already installed them.  They can be set in either an up or down position. 

These crossing gates are intended to be installed below the level of the cork roadbed and it was necessary to make some modification to have the grossing gate arm at a more realistic level when down.  I ran into the same issue with the Green Max gates on the 1st crossing and covered that in THIS POST.  For the gate on one side of the street I cut down the height of the base as shown here so it could be glued down to the existing scenery.

On the other side of the street things are a bit more complicated.  The gate will actually be on another module as the edge of the street is where the seam is between the modules.  For this gate I cut an opening in the cork that the base could fit into and attached a small magnet to the inside of the base with E6000 adhesive.  


And here are all of the gates and signals installed on the module.  On the 3 that are not held by a magnet I used E6000 adhesive to attach them to the existing base.   Of course there is more I need to do to finish this scene and I will cover that in a future post.


Sunday, March 18, 2018

Subway construction site details

Another item that I picked up on my visit last year to the Tomix store in Saitama was kit number 051 from their Diorama Collection.  I had seen two story prefab buildings like this on construction sites in Japan so wanted one of these for the subway construction site.

Here in the states these things tend to be single story mobile home looking things that are towed from site to site.  This is where the bosses hang out and have their meetings and such.


There was more in the kit than what the photo on the box suggest.   3 outhouses, 2 stacks of pallets, 6 sheets of material, and 3 stacks of girders.  There is also a sticker set.  The building is the only thing requiring any assembly and that was quite easy.
The office and a container from a TomyTec truck were placed over the screws that secure the construction staging area across the street from the subway site.  Extra tower crane sections, vehicles, figures, and details from the TomyTec set fill out the scene.
I recycled some of the old fence that was replaced in the last post.  I cut it into sections of steel deck plate which were stacked waiting to be installed.


This is what they look like after some paint and being installed in the scene.  Notice that some of the decking has already been installed on the concourse level of the station.
The truck the container came from got a new flat bed deck and another stack of those steel deck plates.  Another stack of steel deck plates was attached to one of the cranes to show the truck being unloaded.  Brass wire was used to make the cable saddle for the stack being moved by the crane.


Here is an overall view of this scene with one of the cranes.  Black thread was used to simulate the cables. 

The cranes are the tallest things on the module and I remove them for storage. 

I still think there should be something more substantial to the base of the crane but do not know what it should be.


The outhouses from the TomyTec set were placed around the site.  These things are normally pumped out once a week and I have included that function in this little scene.

Wednesday, March 14, 2018

More construction site fencing

It's been quite awhile since I posted anything on this blog.  I have continued to be active in the hobby mostly working on my American prototype home layout.  Not having had an opportunity to display my Japanese prototype modules I have not been motivated to do any work on them either.  We do have our annual week long exhibit at the Hiller Aviation Museum coming up at the end of this month so I am now getting the modules ready for that event.

Last year my wife and I did spend a month in Japan splitting the time between Tokyo, Kyushu, and some places in between.  While there I did pick up a few more things for the Musashi-Koyama modules.

The first one is TomyTec number 052 from the Diorama Collection, construction fencing which I bought while visiting the Tomix shop in Saitama.


Larger construction sites in Japan have folding gates with a rail high enough for large vehicles to pass under when the gate is opened.  I took this photo in Tokyo last year as a reference for modeling construction fencing and gates.   We walked past this spot many times over a 2 week period.
This set includes several long and short fence sections, an open gate, and a closed gate.  The support pieces need to be cut off from the spues and glued to the fence and gate sections.
Here I am test fitting this new fencing in place of the walls that I had scratch built from styrene sheet.  The opened gate can be seen in the background.  Once placement is finalized the new fencing will be secured with adhesive.

Sunday, August 21, 2016

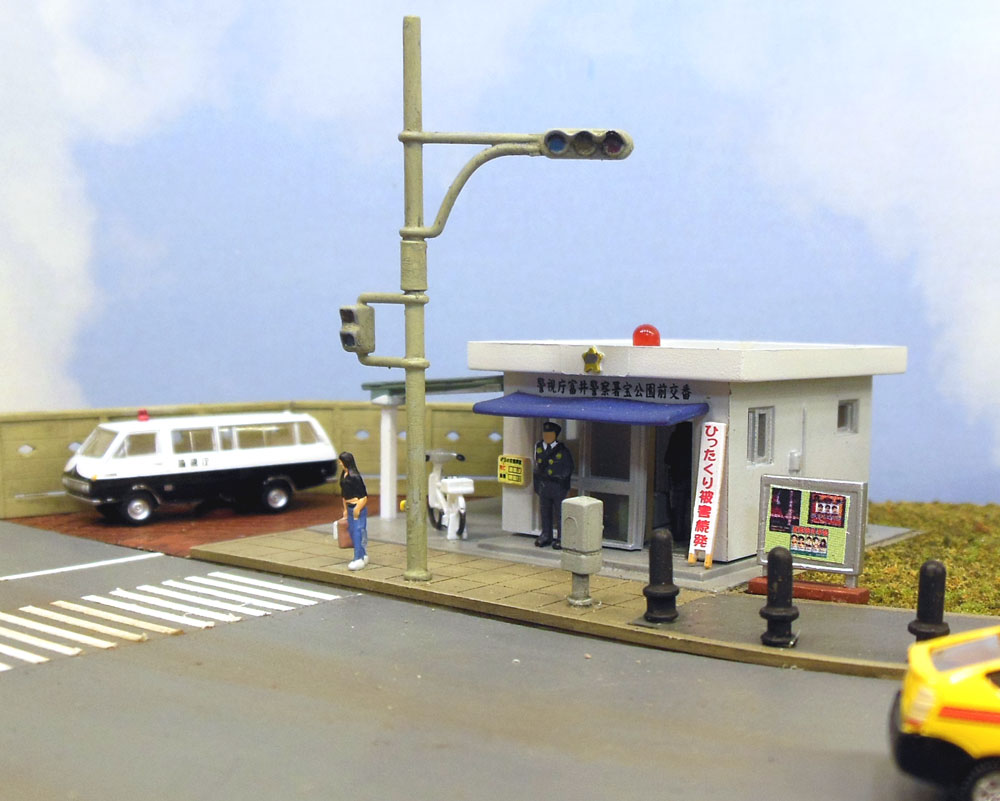
Building the TomyTec Police station

Besides having over 100 actual Police stations, the Tokyo Metropolitan Police Department has over 800 very small neighborhood Police stations referred to as "Koban".

One of the N scale gifts that I've received in my visits to Japan was this TomyTec Koban kit.  This is a great little quick kit that has all of the parts already painted and small enough to fit in many spots.  I wanted to use it on the expansion module because there used to be something very similar to it at that location.  When the area was redeveloped after the surface tracks were removed a new two story Koban building was constructed.

I used all of the parts with this kit and the only modifications I made was to make the base less thick by sanding the bottom and to the LED circuit as explained below.

This kit comes with a red LED to create the red light on the roof of the police station.  The wires extended from the LED through a black plastic tube for 3/4 of an inch which showed in the window of the building.  I modified this by removing the tube and bending the LED leads then soldering wires to them as shown here.  The wires go over an interior wall and down through the base unseen.

This view under the module shows the small 2 pin plug that comes with this kits LED circuit to make placing or removing the lighted structure easier.  As I have quite a few of these same type plugs from the LED's I am using to light my home layout I plan to use this same idea with other lighted structures..

This shot of the finished scene was taken with the small extension module sitting on the bench not connected to the main module.  Everything beyond the street is all part of a scenery sector plate.  The police van on the left covers one of the two screws that holds the scenery sector plate to the module.


Wednesday, August 17, 2016

The bus stop scene


Yet another gift that I had received and am using on the expansion module is this TomyTec bus stop set. It comes with two complete bus stops each with 2 benches and some signs.


I did not use the bases that came with the kit but instead integrated the brick parts into the sidewalks that were on the sector plates that were already in place.  One bus stop is on the new expansion module and the other is across the street from in on edge of the existing module.

This scene is about a block from the station.

The joint between the two modules is between the sidewalk and street so the bus in on one module and the bus stop on the other.

Looking across from the location of the photo above this is the other bus stop.  This was shot taken with the smaller module sitting on the work bench.

In a future post that strange green building in the background will be explained.

Saturday, August 13, 2016

A building being demolished scene

A great way to fill in those odd empty spaces on a urban Japanese layout is to add a construction scene.  In Tokyo there always seems to be construction going on.  Because Tokyo is already fully developed in most cases something old has to be torn down before a new building can be put up and that is what I'm showing in this scene.  One building is torn down with debris being hauled away and a neighboring building still standing will be next to be torn down.

I had this area on one of the original modules that needed something but I did not want to block the view of the row of Green Max houses so this type of scene seemed like a good solution.

A base of .040 styrene was made to fit the area.  To model what was left of some perimeter and interior walls I used .two courses 080 x .080 styrene strip that I carved up to resemble broken concrete using my hobby knife and spue cutter.


Diluted white glue was spread within the walls and Woodland Scenics talus material was sprinkled into the glue.

After the glue had dried I applied Testors acrylic aged concrete to the walls and the talus.  On the talus I dipped the brush in water first to make the paint dilute so it would spread into the crevices.

To make larger debris I used a metal nibbler tool to cut chunks from left over scraps from kit bash projects.  I also threw in some broken scale wood scraps and small chunks from cork roadbed scraps.

These larger chunks were built into a pile on the site held together with diluted white glue.   This pile was painted in several colors representing concrete, wood, metal, etc. then everything on the site was given a coat of Testors black detail wash.

This TomyTec dump truck came with a very plain load.  I used it as a pattern to cut a piece of styrene the same sized then plied up some of the large scraps and saturated it with diluted white glue.

So here is the almost finished scene.  The older building still standing was left over from the TomyTec sake shop kit and heavily weathered.  It also hides one of the screws holding the scene to the module.  The large blue back hoe hides the other screw.

Tuesday, August 9, 2016

Installing TomyTec traffic signals

Another of the gift items I had received was a TomyTec set of traffic signals.  The set includes 8 poles with traffic signals and pedestrian walk / don't walk signals and 4 control boxes.   I noticed that the green lights on 4 of the poles are actually blue but don't know the meaning of that.

My three way intersection with three cross walks on the expansion module would need 3 sets of traffic lights and six pedestrian lights.

In this photo of the intersection I have placed labels showing the type, location, and direction of each signal needed.

P = Pedestrian
T = Traffic.


Because of the odd angle of my intersection I needed to change the angle of the pedestrian signal in reference to the traffic signal on two of the signal poles.  To do this I cut the pole in between the two signal heads and glued them back together at the angle needed with a polystyrene tube  for re-enforcement.  A third traffic signal pole was used without being modified.

The poles were repainted Floquil CN gray which was a close match to the original pole color then given a wash of  Model Master black acrylic weathering wash to bring out the details.  The set comes with a base for each signal pole.  I did not use the bases but found them handy to hold the poles while painting and weathering them.

Three of the poles were cut off between the signal heads to be used as a pole with pedestrian signal only poles.

To do a typical 4 way intersection it would take 4 of these plus 4 unmodified signal poles so a single kit with 8 poles could do it.

Here is a shot from a similar angle as the one with all the blue labels with all of the traffic signal poles installed.  All six signal poles and the control box are visible in this photo.  There is still much to be done on on this intersection scene but so far I am happy the results.

Sunday, July 24, 2016

Modeling Japanese Buses

As great as the passenger rail systems are in Japan, there are also a great many buses.   It makes sense as there are going to be places where the trains don't go and a connection can be made by bus.  Bus stops are often just outside a train station and can easily be included in a modeled scene.  Lucky for us modelers that TomyTec offers some great models of Japanese buses.  Below are examples of three basic types.

Bus tours are very popular in Japan and this is a model of a Japanese tour bus.  There are many companies that run these tours and some of the buses are quite colorful.

There are trains that go to the airport but another option if you have a lot of luggage is an airport shuttle bus.  These make stops at many of the major Tokyo hotels and several of the train stations.

This is a model of a typical city transit bus.  They are smaller than American transit buses and less luxurious than the Japanese tour and airport shuttle buses.  The same Suica card used for the trains also works to pay for a bus ride.

All of these bus models have fantastic details both inside and out.  Even the license plates are readable.  This one is from Shinagawa-ku which is the same general area of Tokyo where Musashi-Koyama is located.

The transit bus body can also be used with a motorized chassis to work with the TomyTec Moving Bus System.

This is the package that the transit bus comes in. Included in the package are some bus stop signs.  The tour and airport shuttle buses come in a cardboard box.

The transit bus was given to me as a gift and I will be using it along with some bus stop shelters that were also a gift on the new extension of the Musashi-Koyama modules .


Thursday, September 10, 2015

Surprise package from Japan

It's common for Japanese people to exchange gifts, especially when visiting or being visited.  Recently we received a package from some of our friends in Musashi-Koyama, Tokyo, Japan.   And along with a couple of purses for Nona and some food items, there were some N scale items.

I received a Tomix suburban house, and a transit bus, and a set of baseball players from Tomytec.  I know our friend Tamami picked these out because she always gives me N scale items when we visit Tokyo.  Even though she is not a modeler herself, she seems to know just the right items that I can use.


Both the Musashi-Koyama modules and the Hot Springs Junction Ntrak module have items that Tamami has given me.

I've got a couple of old modules that were given to me that I've been wanting to refurbish and perhaps I can make more suburban scene on one with a baseball field.  The inspiration for this idea is one of the first Japanese dramas I saw years ago.  I can't remember the name of it now, but it was about some high school baseball teams and where they played was next to some railroad tracks which we were fairly sure was the Chuo line.

Friday, May 8, 2015

Adding to my Tokyo taxi fleet

While in Hong Kong, I spotted a tiny shop at the Kowloon Star Ferry Terminal called 80M Bus Model Shop.  They had all kinds of bus and vehicle models in several scales.  I picked out a couple of 1:160 Hong Kong taxi cabs.  The cabs in Hong Kong are basically the same model cars that are used in Tokyo so I thought they would make be a good stand in.

The 80M Bus Model Shop has several locations around Hong Kong and this English web site.
Having seen this new TomyTec set out on ebay before we left on this trip, I thought I would look for it while in Tokyo and found it at TamTam in Akiharaba.

I had always thought that Tomytec would come out with a big set of taxis the way they have with other vehicles but so far just these small sets.  This new set like the one before it, has two Crown models and two Prius models.  I hope they do the green one next.

At another Akihabara hobby shop I was also able to find this set of Showa era taxis that I was looking for to use on the Hot Springs Junction Ntrak module.

I took these first three photos while packing to come home.  Our luggage situation was such that I had to take all of these out of their packages to consolidate things.

The 80M Bus model actually a tiny bit larger than the TomyTec model. This would not be noticeable unless they are side by side.   It also has rear view mirrors and a bit more painted detail. Overall it's a very nice model.