With the 9 day long Hiller exhibit now behind us, I have started on a new module project. This is not exactly a "new" module and is actually quite old, let me explain.
Back in the 1970's Jim Fitzgerald, Paul Ingraham, and a few others here in the SF Bay area had a modular layout standard they called "Interail". The dimensions were metric, and Paul's AsiaNrail module standards that we are currently using borrow some parts of the Interail standard. From Paul's memory they had set up this Interail layout about 10 or 12 times including at the NMRA National Train Shows in Calgary in 1979 and in San Mateo in 1981.
A few of Paul's current AsiaNrail modules had originally been Interail modules and he had a pair of old Interail modules that had originally been built by Jim that he gave to me.
This is one of Jim's old Interail modules. The modules are in metric dimensions. They have a 22.5 degree angle on each end and if put together can make a 90 degree turn.
The first order of business to bring these old modules back to life was to give them legs. These legs would need to adjust in height between the two heights we use on the AsiaNrail layout. I had not made legs for this narrow of a module before but had some experience with legs for narrow modules from helping Paul set up his modules.
I decided on a design that uses pairs of 2 inch wide strips of cabinet grade plywood that are held together by 1/4-20 bolts. The upper sections have 2 holes with Tee nuts set 8 inches apart while the lower sections have 3 holes set 8 inches apart. To raise or lower the legs, different holes on the lower sections are used.
The first photo showed the legs at the 43.125 inch height. This second photo shows the same set of legs raised to support the module at a 51 inch height which is the normal for AsiaNrail. The cross supports on the top and bottom are bolted to the legs with 1/4-20 bolts into Tee nuts that are on 1/2 inch thick plywood wings that are attached to the leg sections.
For leveling and fine height adjustments, there are four 5/16-18 bolts on the bottom feet.
When not set up the pieces are re-assembled into a storage configuration with the leg sections being sandwiched between the cross supports.
Here is the module up on it's new legs. There is not much on either of these modules except for code 80 track and lots of old ground foam scenery. I have some plans for these that will be much more interesting and with the differences in type of track and wiring I am going to completely strip these down to the wood structure.
So being satisfied with the legs, the next step will be to paint them and then move on to the module itself.
Tuesday, April 10, 2018
Friday, April 6, 2018
2018 Hiller Aviation Museum show
All this week we have had the AsiaNrail layout set up at the Hiller Aviation Museum's annual Trains and Planes exhibit. The Ntrak group had just had a layout two weeks before this and did not join us this year so this was a stand alone AsiaNrail layout this time. However are not alone in the museum. A large FreemoN (N scale) layout, a G scale layout, and an O scale layout are also part of the exhibit for the whole time. This weekend there will also be an HO scale Swiss narrow gauge layout as well.
Each of our layouts are always a bit different and this was no exception. We had a triangle of about 2.5 meters on each side with a long branch line and two short branch lines. The main line was single tracked with a passing siding of some sort on each side.
The staging yard was kept busy with us running everything we had all week. For this layout we tried some blue table cloth fabric for skirting, pinning it to the bottom edge of the module frames. It seems OK but I think we need a better way to attach it.
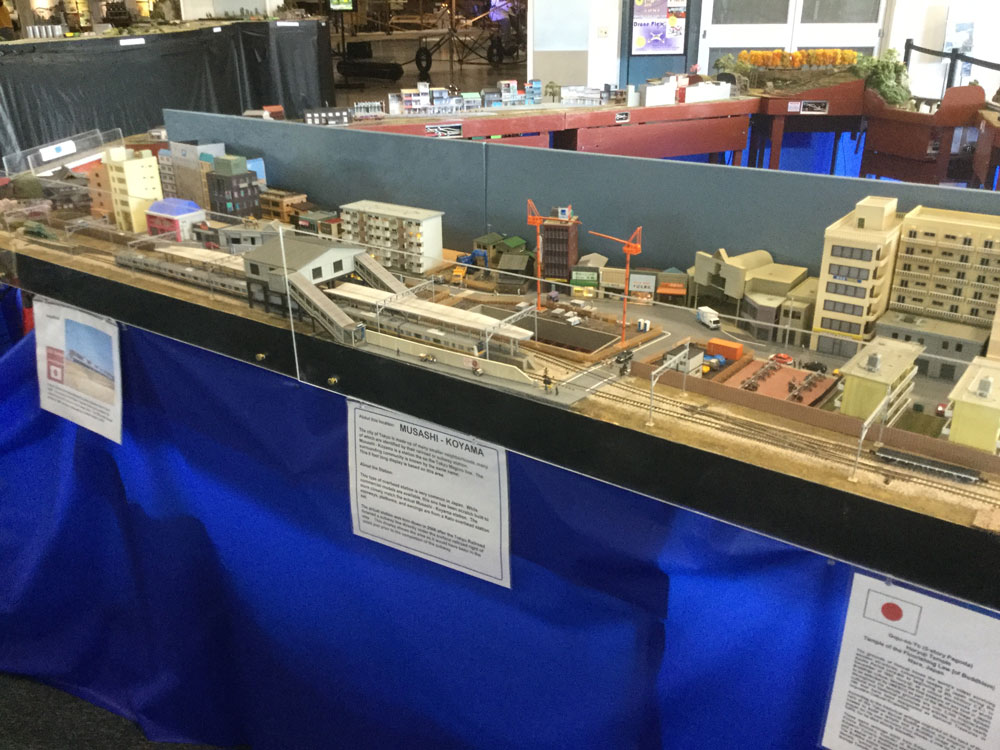
Most of one side of the triangle was made of of my Musashi-Koyama module set. The Plexiglass shields that did not quite fit right last time had been trimmed just a bit and fit perfectly this time. They worked great in keeping the kids hands off things.
The longer branch line consisted of my junction Ntrak module and some of Paul's shorter curved modules. This was the first time we had used the junction without the rest of the Ntrak layout. I think some of those plexiglass shields will be in the future for this module.
Here is a link to some great photos on the JNS Forum taken of the layout at both this years and last years shows. This exhibit runs through Sunday, the 8th.
Each of our layouts are always a bit different and this was no exception. We had a triangle of about 2.5 meters on each side with a long branch line and two short branch lines. The main line was single tracked with a passing siding of some sort on each side.
The staging yard was kept busy with us running everything we had all week. For this layout we tried some blue table cloth fabric for skirting, pinning it to the bottom edge of the module frames. It seems OK but I think we need a better way to attach it.
Most of one side of the triangle was made of of my Musashi-Koyama module set. The Plexiglass shields that did not quite fit right last time had been trimmed just a bit and fit perfectly this time. They worked great in keeping the kids hands off things.
The longer branch line consisted of my junction Ntrak module and some of Paul's shorter curved modules. This was the first time we had used the junction without the rest of the Ntrak layout. I think some of those plexiglass shields will be in the future for this module.
Here is a link to some great photos on the JNS Forum taken of the layout at both this years and last years shows. This exhibit runs through Sunday, the 8th.
Thursday, March 22, 2018
Hot Springs as an AsiaNrail module
Several years ago I rebuilt one of my Ntrak modules to include a junction between the Ntrak Mountain division track and AsiaNrail. When I did this, I also had the idea that the module could be used as part of an AsiaNrail layout without using the Ntrak part. The scenery was designed to be appealing from either side. So far this module has been used in several joint Ntrak / AsiaNrail layouts and several Ntrak layouts without AsiaNrail. With this upcoming week long exhibit at the Hiller Aviation Museum, the Ntrak layout will not be there so the opportunity is here to try out this concept.
Most AsiaNrail modules are no sky board, viewed from both sides. So I made a profile board to replace the sky board for this layout, shown in this photo. This covers the open back side of the hills where the turnout motors are. The plan is for this module to be at the end of one of the branch lines.
Sunday, March 18, 2018
Subway construction site details
Another item that I picked up on my visit last year to the Tomix store in Saitama was kit number 051 from their Diorama Collection. I had seen two story prefab buildings like this on construction sites in Japan so wanted one of these for the subway construction site.
Here in the states these things tend to be single story mobile home looking things that are towed from site to site. This is where the bosses hang out and have their meetings and such.
There was more in the kit than what the photo on the box suggest. 3 outhouses, 2 stacks of pallets, 6 sheets of material, and 3 stacks of girders. There is also a sticker set. The building is the only thing requiring any assembly and that was quite easy.
The office and a container from a TomyTec truck were placed over the screws that secure the construction staging area across the street from the subway site. Extra tower crane sections, vehicles, figures, and details from the TomyTec set fill out the scene.
I recycled some of the old fence that was replaced in the last post. I cut it into sections of steel deck plate which were stacked waiting to be installed.
This is what they look like after some paint and being installed in the scene. Notice that some of the decking has already been installed on the concourse level of the station.
The truck the container came from got a new flat bed deck and another stack of those steel deck plates. Another stack of steel deck plates was attached to one of the cranes to show the truck being unloaded. Brass wire was used to make the cable saddle for the stack being moved by the crane.
Here is an overall view of this scene with one of the cranes. Black thread was used to simulate the cables.
The cranes are the tallest things on the module and I remove them for storage.
I still think there should be something more substantial to the base of the crane but do not know what it should be.
The outhouses from the TomyTec set were placed around the site. These things are normally pumped out once a week and I have included that function in this little scene.
Here in the states these things tend to be single story mobile home looking things that are towed from site to site. This is where the bosses hang out and have their meetings and such.
There was more in the kit than what the photo on the box suggest. 3 outhouses, 2 stacks of pallets, 6 sheets of material, and 3 stacks of girders. There is also a sticker set. The building is the only thing requiring any assembly and that was quite easy.
I recycled some of the old fence that was replaced in the last post. I cut it into sections of steel deck plate which were stacked waiting to be installed.
This is what they look like after some paint and being installed in the scene. Notice that some of the decking has already been installed on the concourse level of the station.
The truck the container came from got a new flat bed deck and another stack of those steel deck plates. Another stack of steel deck plates was attached to one of the cranes to show the truck being unloaded. Brass wire was used to make the cable saddle for the stack being moved by the crane.
Here is an overall view of this scene with one of the cranes. Black thread was used to simulate the cables.
The cranes are the tallest things on the module and I remove them for storage.
I still think there should be something more substantial to the base of the crane but do not know what it should be.
The outhouses from the TomyTec set were placed around the site. These things are normally pumped out once a week and I have included that function in this little scene.
Wednesday, March 14, 2018
More construction site fencing
It's been quite awhile since I posted anything on this blog. I have
continued to be active in the hobby mostly working on my American
prototype home layout. Not having had an opportunity to display my
Japanese prototype modules I have not been motivated to do any work on
them either. We do have our annual week long exhibit at the Hiller Aviation Museum coming up at the end of this month so I am now getting the modules ready for that event.
Last year my wife and I did spend a month in Japan splitting the time between Tokyo, Kyushu, and some places in between. While there I did pick up a few more things for the Musashi-Koyama modules.
The first one is TomyTec number 052 from the Diorama Collection, construction fencing which I bought while visiting the Tomix shop in Saitama.
Larger construction sites in Japan have folding gates with a rail high enough for large vehicles to pass under when the gate is opened. I took this photo in Tokyo last year as a reference for modeling construction fencing and gates. We walked past this spot many times over a 2 week period.
This set includes several long and short fence sections, an open gate, and a closed gate. The support pieces need to be cut off from the spues and glued to the fence and gate sections.
Here I am test fitting this new fencing in place of the walls that I had scratch built from styrene sheet. The opened gate can be seen in the background. Once placement is finalized the new fencing will be secured with adhesive.
Last year my wife and I did spend a month in Japan splitting the time between Tokyo, Kyushu, and some places in between. While there I did pick up a few more things for the Musashi-Koyama modules.
The first one is TomyTec number 052 from the Diorama Collection, construction fencing which I bought while visiting the Tomix shop in Saitama.
Larger construction sites in Japan have folding gates with a rail high enough for large vehicles to pass under when the gate is opened. I took this photo in Tokyo last year as a reference for modeling construction fencing and gates. We walked past this spot many times over a 2 week period.
This set includes several long and short fence sections, an open gate, and a closed gate. The support pieces need to be cut off from the spues and glued to the fence and gate sections.
Here I am test fitting this new fencing in place of the walls that I had scratch built from styrene sheet. The opened gate can be seen in the background. Once placement is finalized the new fencing will be secured with adhesive.
Tuesday, August 15, 2017
Japanese items in an N Scale database.
For a bit over a year now I have been assisting with the establishment of a comprehensive database of N scale products. We currently have over 43,000 items in the database with more being added every day.
One of the areas I have been focusing on including are Japanese prototype items. I have been entering passenger sets, buildings, vehicles, and figures.
This database is well worth checking out. Points can be earned for entering items and then can be exchanged for a variety of N scale items or for subscriptions to N Scale Magazine or membership in the N Scale Enthusiast organization.
I personally have found the database helpful on several occasions when doing research. When calling up a particular item in the database, it will indicate if that item is available for sale on ebay or Amazon with links to the listings. The database itself also has items for sale on this database at reasonable prices.
One of the areas I have been focusing on including are Japanese prototype items. I have been entering passenger sets, buildings, vehicles, and figures.
Click HERE to link to the N Scale database.
This database is well worth checking out. Points can be earned for entering items and then can be exchanged for a variety of N scale items or for subscriptions to N Scale Magazine or membership in the N Scale Enthusiast organization.
I personally have found the database helpful on several occasions when doing research. When calling up a particular item in the database, it will indicate if that item is available for sale on ebay or Amazon with links to the listings. The database itself also has items for sale on this database at reasonable prices.
Thursday, April 27, 2017
The climbing tower crane
Cranes like the ones shown in this photo are a common sight in Tokyo. Because this type of crane does not have the range of the larger ones with horizontal beams there are often several on larger construction sites.
I saw this kit in a hobby shop on one of our trips to Japan and knew immediately this was what I wanted for the subway construction scene.
Now that the work on that construction scene has started I can finally put this kit together. It was not clear to me from looking at the package but when I opened it I was pleasantly surprised to find that there are 2 crane kits included plus some great little construction scene details.
Before purchasing this crane kit I had not heard of this company, Studio Mid. Turns out that they have several other N scale kits for modeling construction scenes. I have not seen anything from them on ebay but here is a LINK to the HobbySearch.com store with all the Studio Mid N scale products.
The crane kits come in red or yellow. I would have preferred the red but when I bought it they only had yellow so I painted my cranes reefer orange.
I made some substantial looking support bases from styrene tile with another layer of .040 styrene under it. Then the crane bases were attached to this with ACC glue.
To highlight the relief in sections of the tower, I brushed on some Testors black weathering wash and then wiped it off before it had completely set.
In the lead photo of the prototype the crane on the right is seen adding or removing a section from it's own tower. Each crane in this kit comes with two towers, one longer and one shorter. Both represent several actual sections attached together. I used the longer towers and then cut the shorter ones into their individual sections and set them in the support area.
These are now completed with the exception of stringing the thread through, that might prove to be the most difficult part.
Subscribe to:
Posts (Atom)