I had several of the old Atlas pony girder bridge sections that were saved from the old module and they are just the right length. They have nice detail on the outer girder sides but I wanted the bridge to have an open deck and because of the curve I did not think the trains could clear the girders if they were above the track.
Looking for ideas on the Internet I found this photo on RailPictures.Net and realized I had what I was looking for. There would be clearance to allow for the girders to be under the tracks. I could cut the detailed girders off from the deck part of the Atlas bridge and use them.
After cutting through the deck along the edge where the girders are with a razor saw and sanding that area of the girders smooth, I cut 2 sections of .080 x .080 styrene strip to a length equal to the bridge girders. Then I attached these along that same edge with Plastic Weld.
Next I cut 2 sections of .060 styrene angle to the same length as the bridge girders. Then I placed a section of .156 I beam material between the square strip and the angle to use a spacer as shown here. Small amounts of Plastic Weld were used to attach the angle in place.
Because the track that will be on this bridge will have a slight curve to it so I wanted the bridge to be wide enough to allow for that. I settled on a width of 20 scale feet and cut up 15 sections of the I beam material to this length with my "Chopper".
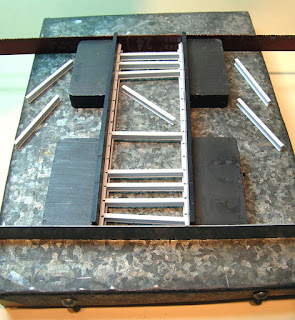
The bridge girders are 65 scale feet long. I had made 15 marks 4 feet apart along the L channel on both bridge girders. Laid out on my metal plate & magnets building jig the I beams can easily be inserted into the channel between the channel on the bridge girders created by the .080 x .080 styrene strip and the L channel. Yes, those are hacksaw blades used to square up the ends.
After the Plastic weld was set on all those joints, this ends up being a sturdy little structure. Here is the model bridge sitting on some magnetic bridge abutments. :)
I then added a styrene channel on each end and cut two strips 3 scale feet wide of V groove siding across the board pattern to simulate the walkways. They cover the top of each bridge girder and .080 x .080 styrene strip and overhang the girders just a little
So far everything I've done with this bridge was from materials I had on hand. The materials list so far:
Looking for ideas on the Internet I found this photo on RailPictures.Net and realized I had what I was looking for. There would be clearance to allow for the girders to be under the tracks. I could cut the detailed girders off from the deck part of the Atlas bridge and use them.
After cutting through the deck along the edge where the girders are with a razor saw and sanding that area of the girders smooth, I cut 2 sections of .080 x .080 styrene strip to a length equal to the bridge girders. Then I attached these along that same edge with Plastic Weld.
Next I cut 2 sections of .060 styrene angle to the same length as the bridge girders. Then I placed a section of .156 I beam material between the square strip and the angle to use a spacer as shown here. Small amounts of Plastic Weld were used to attach the angle in place.
Because the track that will be on this bridge will have a slight curve to it so I wanted the bridge to be wide enough to allow for that. I settled on a width of 20 scale feet and cut up 15 sections of the I beam material to this length with my "Chopper".
After the Plastic weld was set on all those joints, this ends up being a sturdy little structure. Here is the model bridge sitting on some magnetic bridge abutments. :)
I then added a styrene channel on each end and cut two strips 3 scale feet wide of V groove siding across the board pattern to simulate the walkways. They cover the top of each bridge girder and .080 x .080 styrene strip and overhang the girders just a little
So far everything I've done with this bridge was from materials I had on hand. The materials list so far:
- Atlas girder bridge, P/N 2548 (salvaged)
- Evergreen square .080 x .080 styrene strip, P/N 164
- Evergreen .156 I beam strip, P/N 275
- Evergreen .156 channel strip, P/N 265
- Evergreen .060 angle strip, P/N 291
- Evergreen .040 V-groove siding, .060 spacing, P/N 4060
I'll still need to put some hand rails and find the appropriate paint color but it's Sunday and the hobby shop is closed. I'll also want to re-stock the styrene items I used up so maybe tomorrow I'll try the hobby shop and continue on this project.


No comments:
Post a Comment