Saturday, March 15, 2025

Visiting the Tomix layout in Kanda

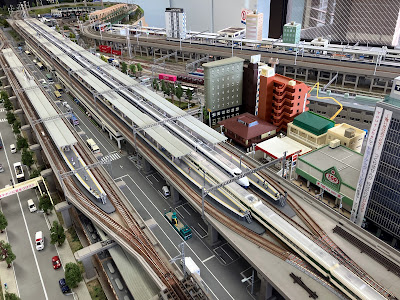
While in Tokyo this past January I visited the Tomix World layout in Kanda.  This is a showroom of products and dioramas and a large operating layout.  There is not anything for sale here and the admission is free.  It's on the 7th floor of this building near the Kanda station.  The enterance door to the elevator is to the right of the Family Mart under the round window.


Of course I took a bunch of photos.  Here's some of the best ones of the large layout which had many different trains running. 


This is definitely worth a visit if you are in Tokyo.  Here's a link to their English web site to check for their hours.  https://www.tomixworld.jp/

Saturday, March 8, 2025

The Tomix Pachinko Building - Part 2

After finishing how the lighting was going to work I moved on to finishing the interior detail.  The kit included 4 rows of pachinko machines and 8 rows of seats.  These were removable from the base but were made of a type of plastic that did not take paint very well so I had to spray them with an adhersion promoter before painting.  I had a bag of background quality figures and about half the seats got  occupants after their legs were cut off. 


The kit included stickers for pachinko machines and other interior surfaces that were part of the base.  A few more standing figures were also added.


The roof normally sits loosely over the original battery compartment.  To hold this roof on but have it still be removable, I glued a small magnet to a scrap of .030 styrene sheet and then taped that over the walls of the battery compartment.


Then a scrap of steel starping was glued to the inside of the roof with E-6000 adhesive.


The entire inside and outside of the building got painted.  The building itself was already glued together so I just had to paint it carefully by hand.  The outside of the building also got a bit of light weathering using detail wash with the roof section getting a little heavier treatment.


The railings that came with the kit were painted and installed on the sidewalk section and a few more figures were placed outside the building.  


Saturday, March 1, 2025

The Tomix Pachinko building- Part 1

Years ago I found this Tomix building at a local train show for 10 dollars and when I built these modules I found it easy to fill in an empty space with it.  It already had some unpainted interior details so I thought some day I would like to finish this structure and light the inside.  That day has finally come.


Tomix buildings like these often come with a nice sidewalk section that interlocks with the structure base.  This set had this front sidewalk plus another section for a parking lot in the back.  When I first installed this on the module there was no room for the sidewalk so I left it off.  Now that the modules are developed further, I decided to use the sidewalk so I cut the parking lot section to fit and moved the structure back just a bit.


This building has a sign in the front that lights with 3 LED's connected to a circuit that makes them flash in sequence.  The light was barely visible through the sign and I had considered replacing it with something else.  What I discovered was that the LED's were positioned too far behind the sign for the light to be effective.  I found that if I fitted styrene tubing over the LED's the light was more focused so decided to keep the sign. 


I built a small 3 volt regulator circuit to replace the pair of AA batteries that had been powering the sign.  The load is very small but I still added a heat sink and did a 24 hour test to be sure this circuit would stay cool.


To light up the interior of the first floor I made a ceiling out of .030 styrene sheet and glued it to the existing plastic piece that holds the lighted sign and front doors and windows in place.  5 surface mount LED's were inserted through holes in the ceiling and scraps of decoder wires were used to connect them to a PC board from a Kato GP50.  This was also something left over from a decoder installation.  These will run on the 12 volt DC power circuit with a current limiting resistor.  The photo below shows the top side of this ceiling.


To be continued .......