Showing posts with label Kato. Show all posts

Monday, January 27, 2025

Finishing a Kato office building

I know, long time no post.  I've been keeping busy with my American theme home layout but with another 5 day long exhibit of the AsiaNrail layout coming up at Hiller Aviation Museum in April I wanted to finish a few more things on the modules.

This Kato office building was one of the first Japanese buildings I bought back around 2009 but never finished.  A couple of years ago I did get around to painting it to get rid of the plastic look.  Now I want to get rid of the vacant look.

The Kato part number is 23-435 and they are still available.  These buildings are particularly well designed, have interior walls, and can be easily made taller or shorter 2 floors at a time.  I'm leaving this one at it's stock 6 floor height.


I decided that I wanted to light and detail the lowest 2 floors.  The ground floor was going to be a convenience store and the base already had detail for a restaurant so I cut that off with a hack saw. 


The base got a new floor and wall arrangement to resemble a small convenience store.  Shelves and counter were made from scraps of styrene and printouts of on line photos pasted to the shelves. 


The 2nd floor was going to be a pizza restaurant and the interior for that was built on the existing 2nd floor insert that is part of the kit.  Most of the fixtures were scratch built and the chairs came from a Pieser set. 


The upper floors windows got blinds printed out on paper, taped to the inside of the windows and set at various heights.  The upper floors businesses include a music school,  an optometrists,  a language school, and a dental clinic.  The signs were created using Google translate, then copying the Japanese text into Microsoft Visio where it can be edited for size and color.  Background color and any graphics are also added then printed out on plain paper.  Glossy package tape was used to give the signs some shine then they were pasted on styrene strip.


Here is a closeup of the floors with interior detail.  Two surface mount LEDs were used on each floor.  The restaurant has warm spectrum LEDs and the convenience store has white LEDs.


Here is the completed building back on the module.  I added that billboard sign on the side of the building from a image I found on the internet.  The type of glue featured in the ad is the same as what I used to paste some of the paper parts of this project.

The vertical signs on the front of the building were made the same way as the signs that are above each window then pasted to each side of a strip of styrene.


Thursday, March 23, 2023

Getting ready for the next show

Back after a month in Japan and only 3 weeks before our next layout setup at the Hiller Aviation Museum as mentioned in the last post.  In this layout I will be displaying all of my Japanese modules.  The Hot Springs Junction and the pair of 45 degree modules were all checked out before we left for Japan and are ready to go.  Between now and the show I am checking out the Musashi-Koyama set of modules.  The modules came through the long period of storage just fine and only needed the track to be cleaned.

With each setup I try to have a little something more finished on the modules.  Over the next couple of weeks I plan to finish a Kato Diotown building that has been sitting on the module unfinished since it's beginning in 2011.

Here's the building in pieces as it sits on my work bench.   Right now going through all the stickers I have and figuring out what types of businesses will occupy it.


I also plan to work on some more street signage and add some more people that I purchased while in Japan.

Monday, August 5, 2019

Using Kato DioTown detail parts

Kato offers several sets of street and utility details as part of their DioTown series.  These are primarily meant to model a Japanese scene but many of the pieces fit in just fine on an American prototype layout.

In this scene I am going to use parts from sets 23-213 and 23-215.  Some guardrails from set 23-213 were already used on the highway module.
These are meant to be plugged into specific holes on the DioTown bases but can also be adapted to use anywhere.  This photo shows holes I have drilled in the sidewalk outside the Tomix condo building.


The utility poles are square on bottom where they would plug into the DioTown base.  These can easily be rounded with a file.

Most city utility poles in Japan are steel so I painted these a light gray and added a couple of the optional transformers provided.
So here is some of the fence, a utility pole, and 2 street lights painted up and placed in front of the Tomix Condo building.  Another utility pole was finished and is just to the right out of the photo.


Thursday, August 4, 2016

Street markings

I have always wanted to apply some sort of street markings on the Musashi-Koyama modules.  Adding the small expansion module with it's streets seemed like a good time to do it.

Shown in this photo is a Kato set of road stickers that is part of their Diotown series of products.  I would need quite a few of these to get enough of the white striping and they seem to be hard to find right now.  I did not even see them last year when I visited the Kato store in Tokyo.

On the Hot Springs junction module's station platforms I had used Builders in Scale HO scale yellow highway striping to create the platform edge warning line and had liked the results.  I posted about this in June of 2014 in a post titled Scratch built platforms - Part 3

So I picked up two versions of this same product in white at my local hobby shop.  One version has solid lines just like the yellow one and the other version has dashed line of varying lengths.

I was concerned that being HO scale the lines might look over sized but they are actually just a bit slimmer than the lines that are on the bases of some of the kits.  This photo shows a side by side comparison of a TomyTec bus stop base and my striping work on the Musashi-Modules.

To do the boundary lines I used a .010 x .250 strip of polystyrene as a guide lined up along the edge of the road and held in place with blue painters tape.  The painters tape I used is the type that is for delicate surfaces.  It takes a bit of practice to keep the lines straight.

I used a narrow paint roller handle with a hard plastic roller to press the lines down once they were in the right position.

Gentle curves like the one showed in this photo can easily be made.  I also did sharper curves around a 90 degree corner but those were quite a bit harder to do.

I had originally planned to use the dashed lines product for the cross walks but realized that it would create too narrow of a cross walk.

So I cut a 3/4 inch strip off the end of the solid line product to use for the cross walks.  This would scale out to about 10 ft or 3 meters which is about right.

When applying the cross walk lines I used a square cut piece of polystyrene sheet as a guide to line up the edges and the spacing between the lines was just done by eye with the spacing between the lines being the same as the line width.


The line ends were close but not perfect.  This flaw seems to be the most noticeable so I used a straight edge and a hobby knife with a new blade to even them up using the two shortest ones as a guide.  The cut off sections were then gently pulled away.


When all the basic lines and the cross walks were done, all of the streets were given a little weathering with Bragdon weathering powders and a coat of Testors Dullcoat.

Sunday, June 21, 2015

Hot Springs Junction wrap up

Over the past few weeks I've been working on finishing all the little things that I wanted to have done on the Hot Springs junction module before the N Scale convention in Sacramento.  Some of those I have covered in more detail in recent posts.  In this post I will wrap up the rest.

Traffic Mirrors


I wanted to add a couple of traffic mirrors on the winding narrow road between the station and the hot springs hotel.  These were scratch built in a similar way to the one I made for the Musashi-Koyama modules in the December 2011 post Seeing around the corners.

Wood rail fence


I felt the edge of the cliff in front of the hot springs hotel should have some sort of fence.  I wanted some sort of wood fence that would fit in with the scene.

I found the Peco NB-45 fence set to be just the thing.  Like the Kato gutter set featured in the last post, this set gives you plenty of material to work with.

Overhead wires


In last Novembers post Overhead wires for Hot Springs Jct. I had identified Tomix 3005 overhead wire structures as being just the right fit for the Ntrak lines.  6 structures were assembled, painted, and installed along the Ntrak right of way.

At this point, the module is packed up and ready to go the N Scale Convention.    This has been an on and off almost 3 year project from the time I started to rebuild the old module and I consider this module to now be 100% complete. I don't think I've ever been able to say that about any other layout or module I've built and it feels good.  Of course there will always be something to be repaired or renewed on the module, or prehaps some tempting new products that come along that I will want to add.

Monday, June 15, 2015

Installing Kato 23-227 gutter set

Back in the fall of 2012 in the post Previously unnoticed track side detail I had mentioned the long row of concrete tiles that run along for miles next to some of the railroad tracks in Japan.  In that post I had also speculated that these may be covered cable ditches for communications cables because I had noticed pipes connecting sensors and signals to these rows of tiles.  At that time I had also identified a Kato set that had parts for building something similar.  Recently I picked up a couple of these sets, Kato part number 23-227.

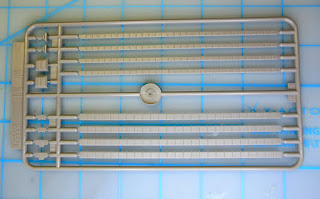
The set includes 4 spues of parts like the one shown in this photo.  The tiled sections are about 5 inches long and there are 4 each of 2 different widths.  There are also a couple of vaults with lids and tees and 45 degree bends.

For this project several sections were attachd together and reinforced with .030 x .060 styrene strip underneath.  A vault section was added to one end of each assembly.

After brush painting concrete color overall, and aluminum color on the vault lids.  I used the clear E6000 adhesive to attach the assembled sections to the roadbed between the yellow and blue Ntrak lines.  Here D cell batteries held things down while the adhesive sets.

This photo shows a finished section after installation.  There is a vault on each side of the river.  My theory is that one or more conduit pipes would exit the vault and go under the road bed and under the bridge to the vault on the other side to continue the path.


This was an easy and fun project, and added a nice touch to the Hot Springs Junction Ntrak right of way.

Sunday, April 26, 2015

The layouts at the new Kato Store


One of the things that makes the Kato shop different is it's operating N and HO scale layouts.  What better way to promote your products than to show them set up and operating.

This view is of the largest N scale layout.

That's a lot of Unitrak !
It would have been great if they had a lot of trains running on this layout but when I was there they only had a couple of trains running.


As most of my photos of moving train models tend to come out blurry, I chose to photograph some of the many detailed scenes on the layouts.

Modeling a station scene in Tokyo, you need taxi cab models and lots of people.

In the upstairs part of the store, there were several smaller layouts and displays along with enough room that they could host club setups of modular layouts.  I have no idea if they actually do that.

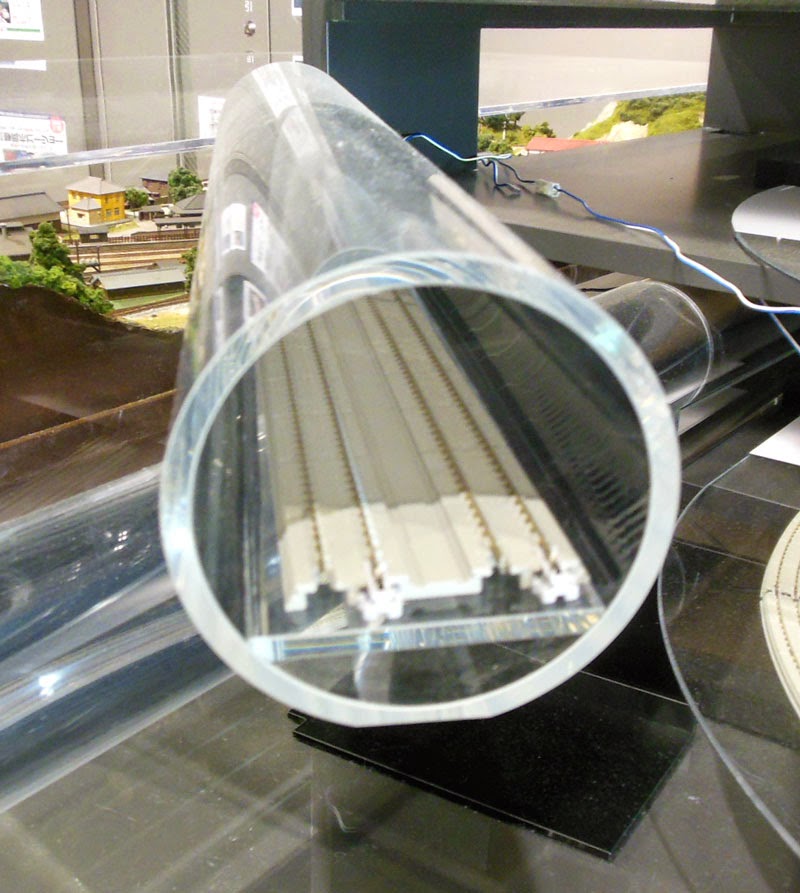
One thing that caught my eye was this display of a section of clear acrylic pipe with a platform inside wide enough for a double track section of Unitrak - for a Subway ?

While not all of the buildings on the layout are weathered or detailed, this small group of older style buildings were very well done.  Are those solar panels on the roofs ?


The Kato Hobby Center is certainly a great place to visit when in Tokyo.  In my previous post, I show a map of how to get there from the nearest subway station.  Here is another link to a great collection of photos done by John Sing in 2008 of  the old store and also has photo directions on how to get there from the subway station.

Tuesday, April 21, 2015

Shopping at the new Kato Store

My first visit to the Kato Hobby Center in the Shinjuku ward of Tokyo was in 1999.  I went again in 2005 and both those times I took the Sebu-Shinjuku line from Shinjuku as I was not yet comfortable with the subway system.  This required a bit of walking up hill from Araiyakushimae Station.  The past couple of trips I used my shopping time to explore some the the hobby shops in other parts of town such as in Akihabara.  On this trip I was aware that the shop had been complety rebuilt since the last time I have visited and was better than ever.  Also I needed to find a replacement for a broken coupler on one of my Japanese Shinkansen trains so this was high on my list.  By now being more comfortable with the subway system, I took the subway this time only needing one transfer.

This map shows my route from the Toei Araiyakushimae station to the Kato Hobby Center.

It's a short walk on level ground from exit A1 of the station to the Kato store.

This is the view approaching the shop from the subway station.

This was an entirely new building since the last time I had been here.  Only the railcar in front is the same.

As I was looking for a replacement for a broken coupler on my N700A power car I was drawn to the parts aisle.  In the old shop, much of these parts were behind the counter but it seems it's all self service now.

And I was not disappointed.  I found the part in this aisle, picked up two packs of each type of coupler for this train so I would have some spares.

As these seem to be positioned in the aisle by part number, it's helped that I had the part numbers for what I wanted written down.

Besides having Kato products, this is a full line hobby shop.   It's quite spacious inside with wide aisles.

As they did with the old shop, there are also operating N scale and HO scale layouts.  I will show something of that in my next post.