Last week was the 39th annual National Narrow Gauge Convention in Sacramento where we had our biggest yet AsiaNrail layout. This was a great, well organized convention which included contest room, 2 vendor rooms, many clinics, and of course a large layout room.
In the layout room besides our AsiaNrail layout there were several other really great layouts in several scales, all narrow gauge.
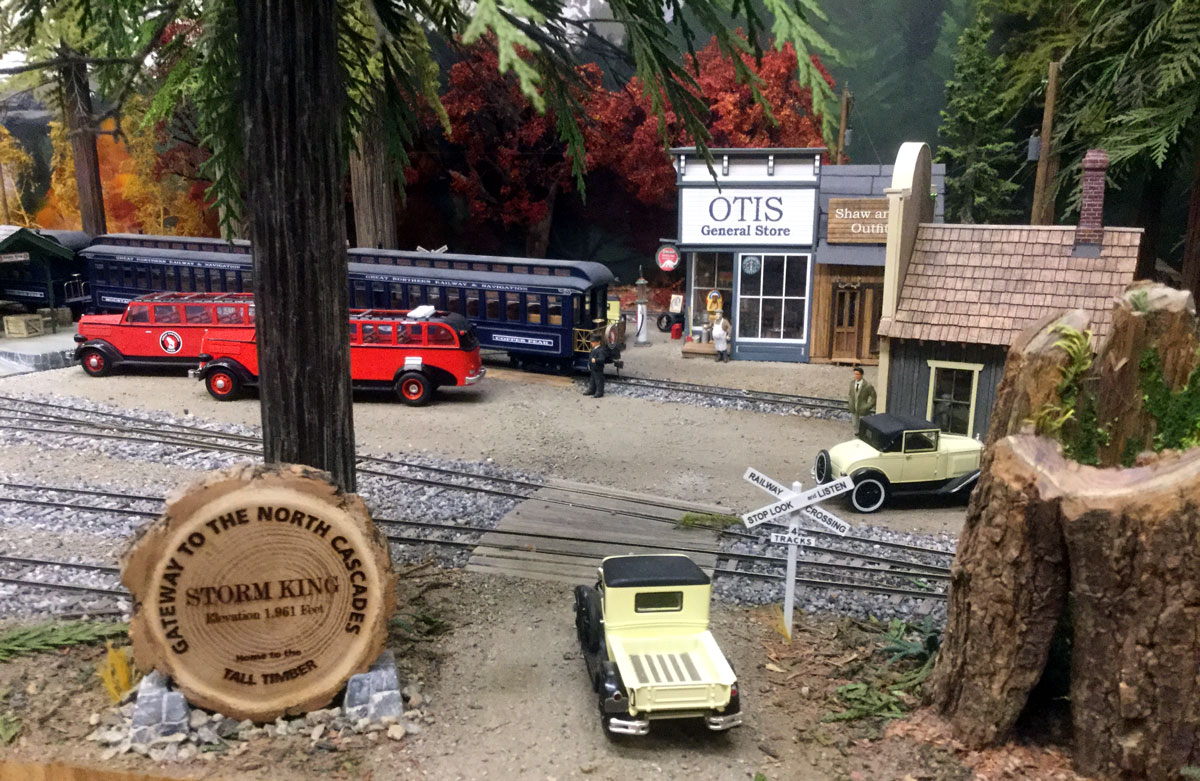
Just one example is this great scene is from an On30 layout called "Storm King".
One nice feature of this convention was that the layout and vendor
rooms were opened from 8:00am to noon and from 6:00pm to 10:00pm. So
everyone got a chance to get out in the afternoons to the California State Railroad museum
and to the many home and club layouts that were on a self guided tour. Our crew visited 9 layouts including 2 garden railways. While I have seen many G scale modular layouts at shows and a few at botanical gardens, this was the first time I had ever seen one in some ones yard and can see why it has become so popular.
This is an overall view of our layout. It was a triangle of 2+ meters on each side with Paul's wye module in the foreground feeding long branch and the 4 way junction feeding a pair of short branches. We set the layout at the 51 inch height.
My new highway module was part of the long branch line. With the magnets holding the vehicles on the highway I was able to put different vehicles on the highway every day.
Paul has also been working on some new modules. With this new port
module we now have inter-modal operations including a container crane
and Kato container trailers.
For this new port module Paul came up with a way to make the water that I had never seen before. He used obscured acrylic sheet bumpy side up with smooth color sheet on the bottom.
Paul has also been working on a car card traffic system for the layout and built some card boxes with a clever little table that folds out. Here he is explaining to the crew how the system works.
Sam did not have his new module ready for this show but still made
the trip up from the Los Angeles area and brought a nice table top
display of items including an old steel herald from the front of a
Japanese passenger train.
This was another successful outing for the modules. I don't get to as many N scale conventions as I would like and after attending this narrow gauge convention I know I will attend others in the future. It gives me more options to attend an event without too much traveling. I may even be interested in attending a garden railway convention if it's close by.
Showing posts with label Kaigan module. Show all posts
Tuesday, September 10, 2019
Saturday, September 8, 2018
Update on the Kaigan module
I had wanted to test both the track and electrical interfaces on the new module with the Hot Springs Junction module. When I was setting this up I realized that I had never installed the trolley poles on the small interface module and the scenery seemed a bit lite or faded compared the the main module.
So after a bit of work here is the view after adding a bit of greener scenery to the small interface module along with the trolley poles.
The track and electrical interfaces worked fine with repeated testing so this new module is ready for exhibit.
Last I had 1/4 inch Acrylic shields made for this module and attached to each side with 8-32 thumb screws. These won't been needed in every layout setup but I wanted them for this next show as we won't have any rope barriers.
So after a bit of work here is the view after adding a bit of greener scenery to the small interface module along with the trolley poles.
The track and electrical interfaces worked fine with repeated testing so this new module is ready for exhibit.
Last I had 1/4 inch Acrylic shields made for this module and attached to each side with 8-32 thumb screws. These won't been needed in every layout setup but I wanted them for this next show as we won't have any rope barriers.
Thursday, July 26, 2018
AsiaNrail at Train Days 2018
Train Days is an annual event held over a weekend in September at the Los Altos History Museum. Either Peninsula Ntrak or AsiaNrail, or both have been part of this show almost every year. We have been invited back this year and it is confirmed that we will have the AsiaNrail layout and we hope to have the Ntrak layout there as well.
This year's event will be on the weekend of September 15th and 16th. Hours are 10:00am to 4:00pm both Saturday and Sunday. Admission is $5.00 per family and parking is free. The museum is located at 51 So. San Antonio Road, Los Altos, CA 94022
https://www.losaltoshistory.org/events/train-days-3/
This layout will be the debut for my new module. I have been working on it on and off since April and am now placing the final touches on it. Inspired by last years trip to Kyushu, this module will be viewed from both sides and the cloud back drop shown in this photo is only temporary.
This layout will also be the first on where we will not be using any rail joiners between the modules so it is hoped that setup will be easier.
This year's event will be on the weekend of September 15th and 16th. Hours are 10:00am to 4:00pm both Saturday and Sunday. Admission is $5.00 per family and parking is free. The museum is located at 51 So. San Antonio Road, Los Altos, CA 94022
https://www.losaltoshistory.org/events/train-days-3/
This layout will be the debut for my new module. I have been working on it on and off since April and am now placing the final touches on it. Inspired by last years trip to Kyushu, this module will be viewed from both sides and the cloud back drop shown in this photo is only temporary.
This layout will also be the first on where we will not be using any rail joiners between the modules so it is hoped that setup will be easier.
Thursday, June 14, 2018
New wiring for the Kaigan module
I have not forgotten about the new module I started in April. With the module frame modified I moved on to working on the track and electrical wiring.
All of the old wiring was replaced and the underside was repainted. All of the new connectors and a gap switch were mounted on a section of aluminum channel. Throttle and turnout power are carried through the module.
There is a gap in the rails in the middle of the module to allow for a boundary between two different throttle zones. If it is not needed the gap switch can close the gap.
All of the old wiring was replaced and the underside was repainted. All of the new connectors and a gap switch were mounted on a section of aluminum channel. Throttle and turnout power are carried through the module.
There is a gap in the rails in the middle of the module to allow for a boundary between two different throttle zones. If it is not needed the gap switch can close the gap.
Monday, April 23, 2018
Joinerless joints for a quicker set up.
For display layouts made up of many small sections, installing the connecting tracks is one of the most time consuming and tedious jobs. Back in the 2014 post "We don't need no stinkin rail joiners" I presented how the track connection between the Hot Springs Junction module and the small extension module was being made without using rail joiners.
Following the success of that single track connection, I then added a double track version of this when I built the 2 Meter module to extend the Musashi-Koyama module set. This has now been used a few times with continued success.
Prior to our most recent layout Paul had also changed the interface between the 2 sections of his Shifen Station module set. This interface has 3 tracks and again we had good success with it. That area is shown here before the interface was modified.
We decided at this show that we are now ready to take the next step of modifying all of the module track interfaces to joiner-less. As I am laying new track on the Kaigan module it was laid right to the edge of the module.
I built this small module to use as a standard to align both the length of the rails and the alignment.
I placed 2 tracks on my standards module with the tracks spaced 25.5mm apart which is the AsiaNrail standard for double track.
In this photo the blue arrows point out the right hand rail on each track. Hopefully we can have these all done before our next layout setup.
Following the success of that single track connection, I then added a double track version of this when I built the 2 Meter module to extend the Musashi-Koyama module set. This has now been used a few times with continued success.
Prior to our most recent layout Paul had also changed the interface between the 2 sections of his Shifen Station module set. This interface has 3 tracks and again we had good success with it. That area is shown here before the interface was modified.
We decided at this show that we are now ready to take the next step of modifying all of the module track interfaces to joiner-less. As I am laying new track on the Kaigan module it was laid right to the edge of the module.
I built this small module to use as a standard to align both the length of the rails and the alignment.
I placed 2 tracks on my standards module with the tracks spaced 25.5mm apart which is the AsiaNrail standard for double track.
In this photo the blue arrows point out the right hand rail on each track. Hopefully we can have these all done before our next layout setup.
Thursday, April 19, 2018
Concept for the new curved module
With the Musashi-Koyama modules and my American Prototype home layout being ongoing projects it would seem like starting another module is crazy. Sometimes for me having something small to work on and actually completing is needed to get re-focused on the bigger projects.
I have had several ideas for this pair of skinny modules with 45 degree curved tracks but decided to use the ones that would take advantage of the depth of the module frames.
On this first one I wanted to create a scene of a rail line that closely follows the coast line. The geography of Japan requires that many of the coastal rail lines do this. This will be simple, with a single track and no structures. I am calling this the Kaigan module which in Japanese means shore or coast.
In this photo I have cut away a section on the inside of the curve and added a new bottom from a scrap of Masonite. This will be an area where there has perhaps been some erosion or landslides so will get some tetra-pods and rock to prevent future problems.
New Masonite fascias have been added to both sides. The one on the inside of the curve is to allow for a bit of a lip to hold the Envriotex I am using to simulate the water and on the outside of the curve is a higher profile to support the hillsides the will be built up there.
The legs have received a coat of black semi-gloss enamel and the module frame a coat of primer. New cork roadbed has also been installed.
I have had several ideas for this pair of skinny modules with 45 degree curved tracks but decided to use the ones that would take advantage of the depth of the module frames.
On this first one I wanted to create a scene of a rail line that closely follows the coast line. The geography of Japan requires that many of the coastal rail lines do this. This will be simple, with a single track and no structures. I am calling this the Kaigan module which in Japanese means shore or coast.
In this photo I have cut away a section on the inside of the curve and added a new bottom from a scrap of Masonite. This will be an area where there has perhaps been some erosion or landslides so will get some tetra-pods and rock to prevent future problems.
New Masonite fascias have been added to both sides. The one on the inside of the curve is to allow for a bit of a lip to hold the Envriotex I am using to simulate the water and on the outside of the curve is a higher profile to support the hillsides the will be built up there.
The legs have received a coat of black semi-gloss enamel and the module frame a coat of primer. New cork roadbed has also been installed.
Tuesday, April 10, 2018
Starting a new AsiaNrail module
With the 9 day long Hiller exhibit now behind us, I have started on a new module project. This is not exactly a "new" module and is actually quite old, let me explain.
Back in the 1970's Jim Fitzgerald, Paul Ingraham, and a few others here in the SF Bay area had a modular layout standard they called "Interail". The dimensions were metric, and Paul's AsiaNrail module standards that we are currently using borrow some parts of the Interail standard. From Paul's memory they had set up this Interail layout about 10 or 12 times including at the NMRA National Train Shows in Calgary in 1979 and in San Mateo in 1981.
A few of Paul's current AsiaNrail modules had originally been Interail modules and he had a pair of old Interail modules that had originally been built by Jim that he gave to me.
This is one of Jim's old Interail modules. The modules are in metric dimensions. They have a 22.5 degree angle on each end and if put together can make a 90 degree turn.
The first order of business to bring these old modules back to life was to give them legs. These legs would need to adjust in height between the two heights we use on the AsiaNrail layout. I had not made legs for this narrow of a module before but had some experience with legs for narrow modules from helping Paul set up his modules.
I decided on a design that uses pairs of 2 inch wide strips of cabinet grade plywood that are held together by 1/4-20 bolts. The upper sections have 2 holes with Tee nuts set 8 inches apart while the lower sections have 3 holes set 8 inches apart. To raise or lower the legs, different holes on the lower sections are used.
The first photo showed the legs at the 43.125 inch height. This second photo shows the same set of legs raised to support the module at a 51 inch height which is the normal for AsiaNrail. The cross supports on the top and bottom are bolted to the legs with 1/4-20 bolts into Tee nuts that are on 1/2 inch thick plywood wings that are attached to the leg sections.
For leveling and fine height adjustments, there are four 5/16-18 bolts on the bottom feet.
When not set up the pieces are re-assembled into a storage configuration with the leg sections being sandwiched between the cross supports.
Here is the module up on it's new legs. There is not much on either of these modules except for code 80 track and lots of old ground foam scenery. I have some plans for these that will be much more interesting and with the differences in type of track and wiring I am going to completely strip these down to the wood structure.
So being satisfied with the legs, the next step will be to paint them and then move on to the module itself.
Back in the 1970's Jim Fitzgerald, Paul Ingraham, and a few others here in the SF Bay area had a modular layout standard they called "Interail". The dimensions were metric, and Paul's AsiaNrail module standards that we are currently using borrow some parts of the Interail standard. From Paul's memory they had set up this Interail layout about 10 or 12 times including at the NMRA National Train Shows in Calgary in 1979 and in San Mateo in 1981.
A few of Paul's current AsiaNrail modules had originally been Interail modules and he had a pair of old Interail modules that had originally been built by Jim that he gave to me.
This is one of Jim's old Interail modules. The modules are in metric dimensions. They have a 22.5 degree angle on each end and if put together can make a 90 degree turn.
The first order of business to bring these old modules back to life was to give them legs. These legs would need to adjust in height between the two heights we use on the AsiaNrail layout. I had not made legs for this narrow of a module before but had some experience with legs for narrow modules from helping Paul set up his modules.
I decided on a design that uses pairs of 2 inch wide strips of cabinet grade plywood that are held together by 1/4-20 bolts. The upper sections have 2 holes with Tee nuts set 8 inches apart while the lower sections have 3 holes set 8 inches apart. To raise or lower the legs, different holes on the lower sections are used.
The first photo showed the legs at the 43.125 inch height. This second photo shows the same set of legs raised to support the module at a 51 inch height which is the normal for AsiaNrail. The cross supports on the top and bottom are bolted to the legs with 1/4-20 bolts into Tee nuts that are on 1/2 inch thick plywood wings that are attached to the leg sections.
For leveling and fine height adjustments, there are four 5/16-18 bolts on the bottom feet.
When not set up the pieces are re-assembled into a storage configuration with the leg sections being sandwiched between the cross supports.
Here is the module up on it's new legs. There is not much on either of these modules except for code 80 track and lots of old ground foam scenery. I have some plans for these that will be much more interesting and with the differences in type of track and wiring I am going to completely strip these down to the wood structure.
So being satisfied with the legs, the next step will be to paint them and then move on to the module itself.
Subscribe to:
Posts (Atom)