Showing posts with label Hot Springs Junction. Show all posts

Friday, April 6, 2018

2018 Hiller Aviation Museum show

All this week we have had the AsiaNrail layout set up at the Hiller Aviation Museum's annual Trains and Planes exhibit.  The Ntrak group had just had a layout two weeks before this and did not join us this year so this was a stand alone AsiaNrail layout this time.  However are not alone in the museum.  A large FreemoN (N scale) layout, a G scale layout, and an O scale layout are also part of the exhibit for the whole time.  This weekend there will also be an HO scale Swiss narrow gauge layout as well.

Each of our layouts are always a bit different and this was no exception.   We had a triangle of about 2.5 meters on each side with a long branch line and two short branch lines.  The main line was single tracked with a passing siding of some sort on each side.
The staging yard was kept busy with us running everything we had all week.  For this layout we tried some blue table cloth fabric for skirting, pinning it to the bottom edge of the module frames.  It seems OK but I think we need a better way to attach it.
Most of one side of the triangle was made of of my Musashi-Koyama module set.  The Plexiglass shields that did not quite fit right last time had been trimmed just a bit and fit perfectly this time.  They worked great in keeping the kids hands off things.
The longer branch line consisted of my junction Ntrak module and some of Paul's shorter curved modules.  This was the first time we had used the junction without the rest of the Ntrak layout.  I think some of those plexiglass shields will be in the future for this module. 


Here is a link to some great photos on the JNS Forum taken of the layout at both this years and last years shows.  This exhibit runs through Sunday, the 8th.

Thursday, March 22, 2018

Hot Springs as an AsiaNrail module

Several years ago I rebuilt one of my Ntrak modules to include a junction between the Ntrak Mountain division track and AsiaNrail.  When I did this, I also had the idea that the module could be used as part of an AsiaNrail layout without using the Ntrak part.  The scenery was designed to be appealing from either side.  So far this module has been used in several joint Ntrak / AsiaNrail layouts and several Ntrak layouts without AsiaNrail.  With this upcoming week long exhibit at the Hiller Aviation Museum, the Ntrak layout will not be there so the opportunity is here to try out this concept.

Most AsiaNrail modules are no sky board, viewed from both sides.  So I made a profile board to replace the sky board for this layout, shown in this photo.  This covers the open back side of the hills where the turnout motors are.  The plan is for this module to be at the end of one of the branch lines.

Wednesday, April 12, 2017

2017 Hiller Trains and Planes exhibit

The 2017 Trains and Plane exhibit is being held at the Hiller Aviation Museum in San Carlos, California between Saturday April 8th, and Saturday April 15th.

Peninsula Ntrak has a 24ft X 18ft layout shown here with the AsiaNrail layout branching off from my junction module in the foreground of this photo.  The AsiaNrail layout has a reasonable sized loop plus two branches, one to the Ntrak layout and another shown in the lower right of this photo.

The lighting in the Museum was just right.  Things were well lighted but still dark enough for the lighting details on the layouts to show up well.

Shown here are my row of Tomix shops with a couple of the shop interiors lighted.

The main line was single track with a staging yard on one side of the layout and Musashi-Koyama station being a passing siding on the other side.

I had done some work on the wiring and controls since the setup last September and this time the operation worked as planned.

In this photo shows shortened versions of my Yamanote 205 series and 485 series trains at the station platform.

Paul has been adding some new scenery to his modules.  Shown here is the new parking area for visitors to the Phoenix Temple.  The main line is passing behind those cherry trees and the train at the station is Paul's Tomix track cleaning train.
We like our shorter passenger trains on the AsiaNrail layout.  Here are Paul's pair of Sanriku Railway type 36 rail diesel cars at the station on my Hot Springs Junction Ntrak module.  The models are from Tomix.  The Sanriku Railway runs in Iwate prefecture, Japan.
Peninsula Ntrak's Japanese corner module was next the the hot springs junction.

I will conclude this post with this shot of a 6 car formation of one of Paul's Taiwan passenger DMU's winding it's way through his Shifen module.

Monday, September 5, 2016

Storing and transport of small modules

For my larger modules I have shells made from 1/4 inch plywood that bolt on to the module frame and form a crate that protects everything on the module but what about a small module like the small extension to the Musashi-Koyama AsiaNrail modules that I have been working on.

I have found that for the small modules I like to make a custom cardboard box.  Here is the small extension module in it's box ready to go to the up coming Los Altos Train Days show.   This box was cut down from an empty wine case.

To secure the module within the box I used the 1/4-20 tee nuts that are already on the module and secure the module with two bolts through holes made in the box.  The same method is used for the small transition module between Ntrak and AsiaNrail.

Tuesday, June 30, 2015

Back from the N Scale Convention

I recently attended the 2015 National N Scale convention that was held in Sacramento, California.  This was the 23rd annual event put on by the N Scale Enthusiast organization and each year held in a different location.  Besides a show with layouts, they also have clinics, tours, auctions, manufacturers and sales tables, and other activities.  It's a busy several days and not easy to do it all.  This years event had almost 500 N scale modelers attending from all over the US and a few other countries.

The event was held at a Double Tree Hilton hotel.  One decent sized room was just for the layouts.  There were 4 layouts each representing something a little different in modular layout standards. Each layout group there could have put up larger layouts but we had to keep them small due to space constraints.

  • Peninsula Ntrak - From SF Bay Area, about 130 miles away.  Uses basic Ntrak 3 track standards. This layout had Nn3 on one module, a large staging yard with lots of trains running, and plenty of detailed scenes. 
  • San Luis Obispo Model Railroad Association - Brought their Bendtrack layout from about 300 miles away.  Lots of great scenery on this layout.  Bendtrack is a double track standard and uses end loops.
  • Silicon Valley FreemoN - Also from the SF Bay Area I see them at most of our local shows.  FreemoN is a single track standard using junctions and end loops and track is code 55.  This group has fine scenery and details on all their modules.
  • Sacramento Valley Ntrak - This is the local Ntrak club which uses some optional Ntrak standards such as the mountain division track and alternate blue.

It would have been great to have had the AsiaNrail layout set up as it would have been a 5th type of standard and of course being Asian prototype would have offered something completely different.  Paul was out of the country and could not make it to the convention so I had my Hot Springs junction module in the Peninsula Ntrak layout as the only representative of Japanese or Asian prototype.  The photos below are all from the Peninsula Ntrak layout.

The club I belong to, Peninsula Ntrak had this unusual triangle shaped layout to fit the space available to us.  We did this using a pair of 45 degree curved modules one of which is seen in the foreground of this photo.

My Japanese themed Hot Springs Junction module was in the layout without any of the AsiaNrail modules attached to the mountain branch line.

Next to my module was this new module done by Tom Knapp that had a Nn3 narrow gauge line looping behind the sky board.

Peninsula Ntrak's Julia Jackson won the award for the best module of all of the layouts with her 6 foot Jackson Corners module shown here.  This module has been around a few years now but still attracts a lot of attention.

Another new module that was in it's first layout was this club corner with a vineyard / winery and a festival.  The scenery was done by Julia who has been rebuilding the scenery on many of our club modules.


I really enjoyed attending this convention. The last one of these I went to was in 2005 in San Diego. I'll try not to let another 10 years slip by before attending my next one.

Sunday, June 21, 2015

Hot Springs Junction wrap up

Over the past few weeks I've been working on finishing all the little things that I wanted to have done on the Hot Springs junction module before the N Scale convention in Sacramento.  Some of those I have covered in more detail in recent posts.  In this post I will wrap up the rest.

Traffic Mirrors


I wanted to add a couple of traffic mirrors on the winding narrow road between the station and the hot springs hotel.  These were scratch built in a similar way to the one I made for the Musashi-Koyama modules in the December 2011 post Seeing around the corners.

Wood rail fence


I felt the edge of the cliff in front of the hot springs hotel should have some sort of fence.  I wanted some sort of wood fence that would fit in with the scene.

I found the Peco NB-45 fence set to be just the thing.  Like the Kato gutter set featured in the last post, this set gives you plenty of material to work with.

Overhead wires


In last Novembers post Overhead wires for Hot Springs Jct. I had identified Tomix 3005 overhead wire structures as being just the right fit for the Ntrak lines.  6 structures were assembled, painted, and installed along the Ntrak right of way.

At this point, the module is packed up and ready to go the N Scale Convention.    This has been an on and off almost 3 year project from the time I started to rebuild the old module and I consider this module to now be 100% complete. I don't think I've ever been able to say that about any other layout or module I've built and it feels good.  Of course there will always be something to be repaired or renewed on the module, or prehaps some tempting new products that come along that I will want to add.

Monday, June 15, 2015

Installing Kato 23-227 gutter set

Back in the fall of 2012 in the post Previously unnoticed track side detail I had mentioned the long row of concrete tiles that run along for miles next to some of the railroad tracks in Japan.  In that post I had also speculated that these may be covered cable ditches for communications cables because I had noticed pipes connecting sensors and signals to these rows of tiles.  At that time I had also identified a Kato set that had parts for building something similar.  Recently I picked up a couple of these sets, Kato part number 23-227.

The set includes 4 spues of parts like the one shown in this photo.  The tiled sections are about 5 inches long and there are 4 each of 2 different widths.  There are also a couple of vaults with lids and tees and 45 degree bends.

For this project several sections were attachd together and reinforced with .030 x .060 styrene strip underneath.  A vault section was added to one end of each assembly.

After brush painting concrete color overall, and aluminum color on the vault lids.  I used the clear E6000 adhesive to attach the assembled sections to the roadbed between the yellow and blue Ntrak lines.  Here D cell batteries held things down while the adhesive sets.

This photo shows a finished section after installation.  There is a vault on each side of the river.  My theory is that one or more conduit pipes would exit the vault and go under the road bed and under the bridge to the vault on the other side to continue the path.


This was an easy and fun project, and added a nice touch to the Hot Springs Junction Ntrak right of way.

Tuesday, June 2, 2015

Adding a water feature

When I finished the river scene on the Hot Springs Junction module last summer, I left a waterfall that did not seem to have a source.  I had run out of time before a show and just put down some quick scenery.  What I had imagined was to have a stream enter the module feeding into a pond which then fed the waterfall.

This photo I took in Kyoto this last March shows a type of concrete stream channel that I had seen in many places in Japan and wanted to include as part of the added water feature on the module.


To model a channel like this I cut out a channel in the existing scenery parallel to the road and between the road and the Sake shop.  Then a concrete painted styrene channel was glued in and scenery built around it.  The bottom was painted with Floquil Gunmetal and then with acrylic gloss medium.

I dug out a little depression in the existing scenery and covered it with plaster cloth.  That was painted a blend of blue and green acrylic. For the water I gave the Envirotex product another try and it came out great.

The stream bed was done in a similar way with the plaster cloth and acrylic paints.  Several coats of acrylic gloss medium was applied.  After the gloss medium dried, Woodland Scenics Water effects was applied with a brush to get some flowing texture, then a final coat of gloss medium.

Here is an overall view showing the area around the Sake shop.  The concrete channel enters from the upper left, passes the building and empties into the pond.  Then the natural stream leaves the pond to become the waterfall.

Sunday, May 24, 2015

Finishing the 2nd type of retaining wall

Last fall, I finished the first of two different types of retaining walls that I have been working on for the Hot Springs Junction module.  That post can be viewed HERE. Now it's time to finish the second type of retaining wall which is a more simple design but there is a lot of it.  For the background on both types of walls see the post Japanese Style Retaining Walls.

Again as I did when finishing the first type of wall, I show here the reference photo I started with for this type of wall and pick up where I left off on the original post.


After the Evergreen tile styrene sheet is assembled to fit the shape of the hillside were it will be installed, the edges are covered with .100 x .100 L channel strip.

On the front facing and top edge of the L channel, I cut a groove as shown in this photo about every 10 scale feet with a razor saw to simulate expansion joints.

When doing the front facing surface I set a thin sheet of scrap over the tile surface to protect it from being scratched by the saw.

Each assembled section of retaining wall was air brushed with Testors acrylic concrete color.

The next step before installing the wall is to give it some basic weathering.  I like to highlight the grooves between the tiles by using diluted India Ink.

A few drops of ink into a Dixie cup filled to the level shown in this photo.  This solution is spread evenly across the wall assembly.  With the wall laying flat it settles into the grooves and that's why I did this before installation.  Brush strokes should be up and down the wall so it will look like natural streaks.

The completed wall sections are attached to the foam land forms with Liquid Nails adhesive.  After the adhesive has set, the scenery is built up as desired to the walls edge and as shown in this photo sometimes over the edge.  This 4 foot module has about 6 feet of large retaining walls of both type presented here.

Thursday, December 18, 2014

Shinkansen train collection

Like most who collect Japanese train models, I have a collection of Shinkansens, also known as bullet trains.  All of my Shinkansen trains are models of trains that Nona and I have actually ridden on.


On the page I maintain called Japanese Train Collection I have up to now only shown my models of non-Shinkansen trains taken on my Musashi-Koyama module set.  This was because I did not feel the Musashi-Koyama module set offered the proper scene to display or photograph Shinkansens.  However the Ntrak lines on the Hot Springs Junction Ntrak module are perfect for the display and photography of that type of train.  I have now included photos of my Shinkansens on the Japanese Train Collection page.

Thursday, December 11, 2014

Details & lighting inside the sake shop

Back in September in the post Building a TomyTec sake shop, I had built one of the buildings from TomyTec kit No. 089 and installed it on the Hot Springs Junction module.  With an open door and some details already part of the kit, I felt this could create a nice little scene. Now I have gone back and added some more details and lighting to the inside of the building.

The kit had come with a couple of low Japanese type tables and an interior wall.  I added additional interior walls as view blocks as the building as some other open doors and I wanted to avoid the see through look.
The 4 figures were selected from various TomyTec and Kato sets.  The seated customers are local workers, perhaps from a construction site. (towels around the necks) who have finished a days work and are enjoying a few drinks.


The wall posters are from a sticker set that came with one of the Tomix building kits and the stock of sake bottles on the back wall are printed from files provided on the Quinntopia blog.

If I was going to detail the inside then I needed to light it so the interior could be seen.   I use bright white LED light boards from Atlas locomotives that are left over after installing DCC decoders.

On this building I added a view block so the same light did not shine out the upper floor windows.

Here is what a visitor to the layout might see peeking into the shop from the front of the module.  Depending on the angle of view, slightly different parts of the interior can be seen.

A little bit of weathering has been applied to the outside and the building is now permanently mounted on the module. A couple of the nearby trees have been relocated to allow for better viewing of the scene.  I still plan to add a few more details to the outside to complete the scene.

Monday, November 24, 2014

Hot Springs as an Ntrak only module

This past weekend the Hot Springs Junction Ntrak module was used in Peninsula Ntrak's layout at the annual Thanksgiving train show held at the Alameda County Fairgrounds in Pleasanton, California.  This was the first time I had this module in the layout without the AsiaNrail layout also attached to it.

Here is a view of the front of the module as it appeared in the layout.  In this layout, the module was much more visible to the visiting public than in the junction configuration with the AisaNrail modules in front of it.

Here is a view looking down the length of the module.  My JR 115 type train can be seen at the station platform.  The line that would go the the AsiaNrail track is long enough to switch this 3 car train into the station stub track.

In this layout fellow Peninsula Ntrak member Joe Giacomini's American prototype 8 ft module set which also as the mountain division was next to the Hot Springs Junction giving us a total of 12 feet of mountain division track to run the 115 on.


For this layout, I mounted the control panel on the back of the module and this worked out just as planned.  Between Joe and I we have a total of 18 feet of Ntrak modules with the mountain division track but no way to complete a turn around.  We are discussing the possibility of using a portable automatic point to point system in the future.  Perfect for double ended Japanese passenger trains.

Passing through the Hot Springs Junction module on the Ntrak red line is one of Paul Ingraham's Australian freight trains.

One of the details I added recently is a fisherman on the bank of the river.   He can been seen in this photo between the tree and the bridge.

One of Peninsula Ntrak's original club corners was re-built several years ago by members Earl and Julia Jackson as a Japanese village on the inner side of the curve and an agricultural scene on the outer side of the curve.

Saturday, November 8, 2014

Overhead wires for Hot Springs Jct.

One of the things I've been working on for the past several days was to get all of the poles installed that would simulate overhead electric wires.  In theory, my free lanced Hot Springs Junction module could be one of those places in Japan that uses Diesel rail cars as those are more common in the more remote mountainous areas.  But the trains that will be run on the mountain division and AsiaNrail lines will include electrics so I wanted to include the wire structures.  Kato, Tomix, and TomyTec all offer versions of this type of model in N scale.

For most of the line I used TomyTec kit No. 020 shown here.  I picked this up on one of my trips to Japan and it looks like I paid 690 yen for each set of 3 double track structures.

I needed single track structures so I cut out the middle section to get two structures from each as shown in this photo.

After removing the model from the spue and cutting out the middle section, I touched up the paint.  The brown of the pole was close to Floquil rail brown and the green of the cross arm was close to an old bottle of Polly Scale paint I had around.

To mount these type of poles I drilled out the inside of a 1/8 inch styrene tube to give the pole a snug fit.  Then drilled a hole in the scenery and glued the tube into the hole.  The tube was then painted a concrete color.

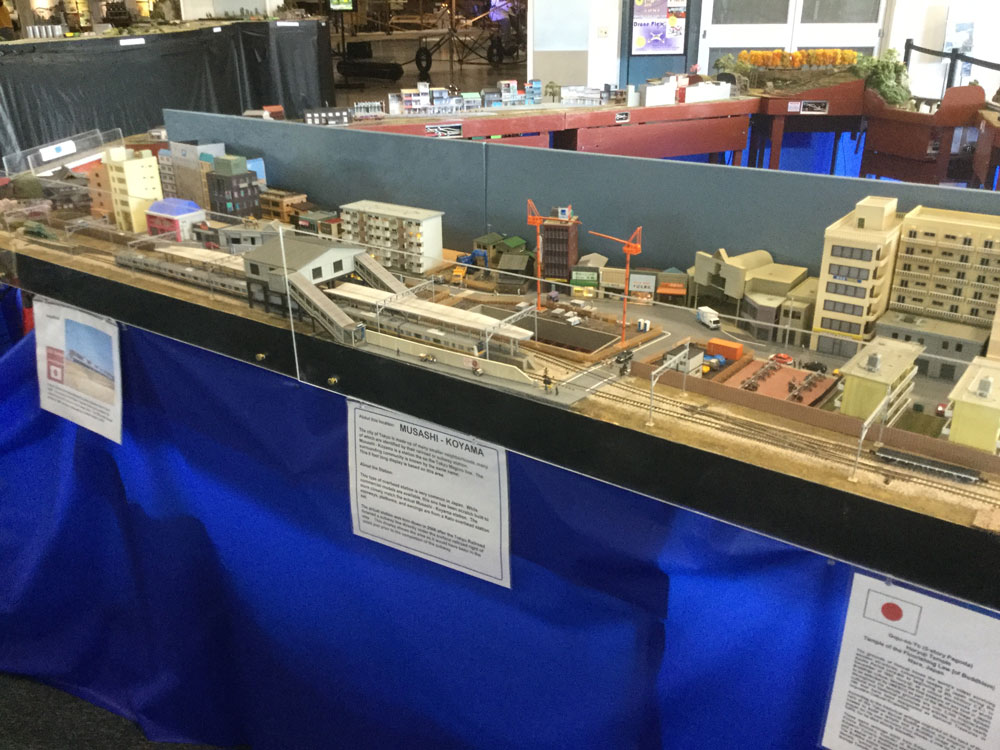
This is a very similar method I used on the Musashi-Koyama modules and that has worked out well.

As with any other track side details it is important to maintain the proper clearances from the tracks, particularly on the inside of a curve.

It's also not that hard to scratch build overhead wire structures for those places where needed.  Here is one of 4 identical ones I made to use between the platforms at the station.

The pole was painted a gray color with the colors of the cross arm, braces, and insulators being a close match to the TomyTec pole structures.

Here is one of the four installed at the station.  For these I drilled a smaller hole and glued the exposed wire on the bottom of the pole without using the plastic tube sleeve the way I did on the TomyTec poles.

Here is the over all view of the station area with all of the poles installed.  I used 13 of the single track poles plus the 4 scratch built double track poles.


Eventually I would also like to have overhead wire structures on the Ntrak lines as well.  The 3 track type of the style from Tomix that I used on the Musashi-Koyama modules line up just right with the Ntrak track spacing as shown here.