Showing posts with label Green Max. Show all posts

Monday, February 10, 2025

Finishing a Green Max office building

On the small extension module I added to one end of the Musashi-Koyama modules to make the set 2 meters long, I have a kit bashed Green Max building from set 46-7 that I never finished.  Coming off the completion of the Kato building, I feel now is the time to tackle this building.


The building is separate from the styrene base and both are held in place on the module with a single 4-40 screw.  The building first got 2 coats of a pale blue color.  It was my first time using Vallejo paint in my air brush and it worked out well after thinning the paint a bit with distilled water.  I'll be using more Vallejo paints in the future.


One of the ground floor entry pieces was installed on the first floor after the trims and door handle were painted with a silver Sharpie pen.  The roof, base, elevator tower door, and awning were all hand painted, and one of the stickers from the set was installed above the ground floor making that floor a bank.  The tenants of the building will be in the financial services industries except for the 2nd floor which will be restaurant.  I painted the window frames on the 2nd floor gold. 


The Green Max building kits don't come with window glazing but include sheets of clear plastic that can be cut and glued to the interior walls.  I used canopy glue to do this.  This particular building was modified to fit in the space and the back wall was left off as it would not be seen once the building is on the module.  This made it easy to access the inside of the building.


The side of the elevator tower got some paper signs that I made on the computer.  The second floor restaurant is a izakaya serving tako which in English is grilled octopus.  The billboard is an advertisement for some sort of fruit yogurt drink.   

Two of the vertical signs from the kit were modified and placed on the corner of the building, a stock broker on the 5th floor and an insurance office on the 3rd.  A real estate office occupies the 4th floor and uses the small sign board.  All of there signs are stickers from the kit.


Sunday, June 16, 2019

Using Greenmax wall sets

On the Hot Springs Junction Ntrak module, I had made my own retaining walls using Styrene sheet and rod materials.  This came out great but was quite a bit of work so this time I found a ready made product by Greenmax.

Greenmax makes 3 different patterns of stone walls that come in a 3 pack with each of the 3 sections measuring 60mm in height and 200mm long.   I choose number 2107 which is an interlocking pattern of square tiles.


To get the height right all of the wall sections needed 2 or 3 rows cut from the bottom leaving the header row at the top.

The length of my retaining walls was long enough that I had to use two sections on each side.  The patterns will line up when the uncut ends are placed end to end.


As the highway crosses the module at an angle, the ends of the wall sections needed to be cut at an angle to match the edges of the module.


On one of the module edges I cut away several rows of tiles to simulate how a wall like this might get lower following the terrain.
I had placed the walls so that the header on top was just above the edge of the module base.  After the wall section was glued into place, the header was cut away in the area where the bridge would be so the bridge could sit on the edge of the module base.


Tuesday, March 28, 2017

Starting the grade crossing scene

I showed this reference photo in one of my first posts, Streets and Buildings.   This scene was just outside the station and is an important scene on the module that I wanted to re-create.


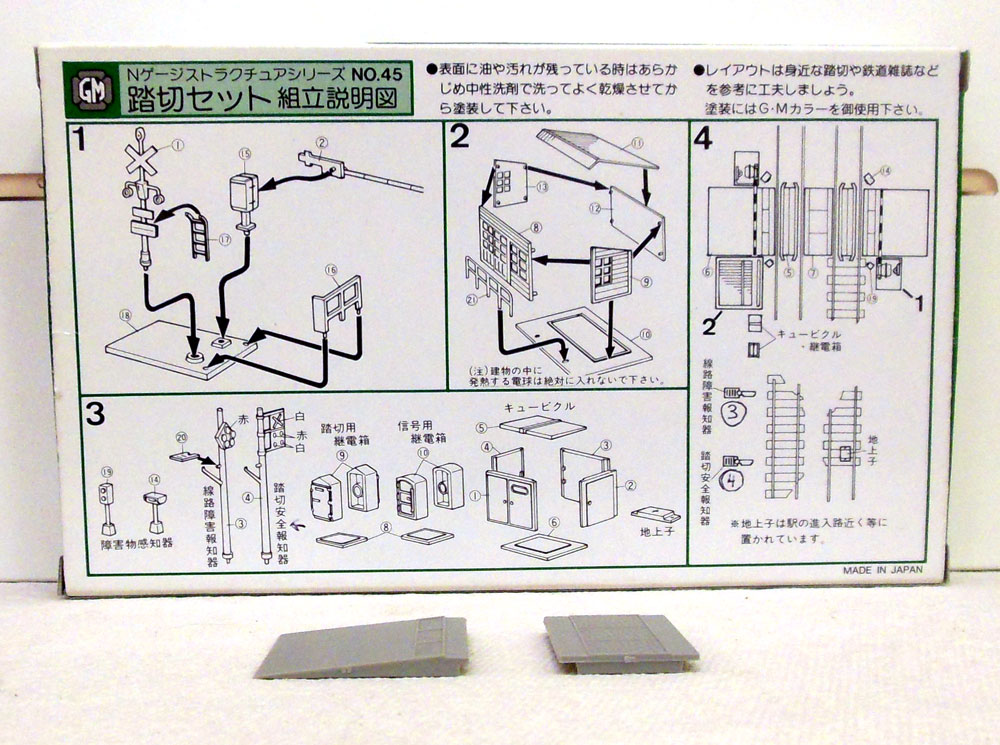
This is old Green Max kit number 45 and this is what I used to create the grade crossing.  I purchased a couple of these kits in Japan but they are also available on ebay.  The new number for this kit is 2153.

Besides the pair of crossing signals and gates this kit includes road sections, train signals, sensors, and other details.  I did not use the road sections as I had already built up the roads.


The bases for the crossing gates were meant to sit at below track level and because I had already built up the roads and surrounding area the gates seemed abnormally high when compared to people.  So I cut out sections in the cork as shown in this photo to lower the bases.
The edges of the now sunken bases were built up with .020 x .040 styrene strip.  Then after gluing the base in place I patched up the road surface around it.  Some of the road striping will also need to be redone.

I modified the gate arm assembly by drilling a hole in the arm pivot point.  Another hole was drilled through the motor mount and tapped for a 00-90 screw to secure the arm to the mount.  An extra Micro-Trains screw was used for this. Doing this allows the arm to be moved between the lowered and raised positions.

The tiny ridges on the gate arms were handy as a guide for hand painting of the yellow stripes.  The striping on the barrier is from a Kato sticker set.

Now this seems better.

So far just using the basic gates and signals from one kit at one crossing.  There are also other signals that can be added and there is still the larger grade crossing on the 2M extension module to do.

Tuesday, March 21, 2017

An electrical substation from scraps

In the previous post The bus stop scene I had promised an explanation of the strange green building in the background, here it is.

On electric railroads there are normally substations alongside the tracks every few miles that supply power to the overhead wire.  On the Tokyu-Megruo line there was one of these between the Musashi-Koyama and Nishi-Koyama stations so I wanted to include one on the module.


The one shown in the photo above is on the Tokyu-Toyoko line.  I got it from Ken Shore's article on catenary.  If you want to learn more about Japanese railroad catenary I highly recommend it.

I started out by modifying one of the unused bases from the TomyTec bus stop kit.  The ridges were smoothed out and styrene strip was used to make bases for the building and a large transformer.

Green Max kit # 75 was something I picked up at a train show years ago.  I used one of the three sets of transformers on this project.
Over 20 years ago I had used parts from the Green Max electrical sub station kit # 25 on a club project but did not use the building.

So here is the chance to use up the rest of that kit.

Here is a photo of the finished model after painting and installed on the module.  The large transformer was scratch built from bits of styrene.  Gold Metal Model fencing removed from an old layout completes the scene.  It was very satisfying that this project was built mostly with left over and re-used parts.

Thursday, August 14, 2014

Finishing the river scene

To display the Hot Springs Junction Ntrak module at the Hiller Avaiation Museum's Train's and Planes exhibit last April, I had laid temporarily tracks on the Ntrak lines.  To complete the scenery in the river these tracks and the three concrete bridges were removed to access the area under the tracks.  In this post I have divided the river into lower and upper scenes.

The lower river scene


With the suggestion and offer of materials from one of the members of Peninsula Ntrak, I chose to cover the area around the bridge abutments with boulders.

White glue was spread around the abutments and pilings, then the boulders were laid on top of that. Other smaller and more rounded rocks were placed throughout the river bed area.

Here is the view from above with almost all of the boulders in place.  The counter sunk screw holes on the ends of the bridges are for the flat head screws that hold the bridges in place.


The upper river scene


This river originates on the module from a concrete bridge that carries the upper railroad racks and station platforms over the river.

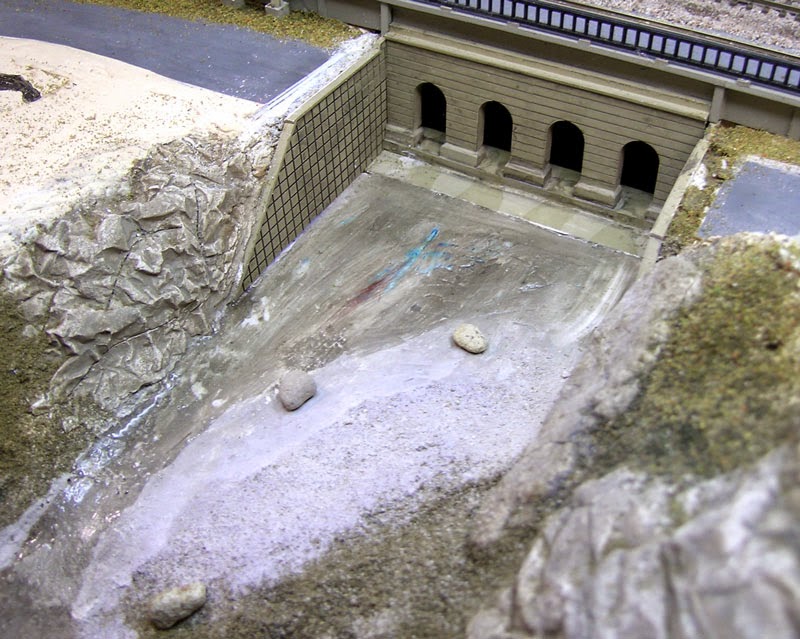
This was made by combining two sections from Green Max kit # 47-5.  The side retaining walls were scratch built from styrene tile.  All were air brushed Model Master aged concrete color and weathered.


There will be a vehicle bridge connecting the two roads seen in this photo that also came for Green Max kit # 47.5 - handy kit !  In this last photo it can been seen that some "water" is running out from under the bridge arches and down the river, more on that in the next post.

Friday, August 8, 2014

Finishing the station scene - Part 2

After spending what hobby time I had in July completing the wiring and controls for this module, this month I'm back to finishing the area around the station.  With the platforms now secured to the module, it was time to install the foot bridge.  Remember from the post Building the Green Max foot bridge that I had made my own support columns so that they would be long enough to reach ground level while the stairs would end at the platform level.

I cut short sections of square tubing that the bridge columns would fit right into.  These were painted concrete color before being placed into square holes cut into the foam.  White glue does not react with the foam and it was placed around the square tubing sections to settle into the space around the tubing.

Here is an over head view showing how the foot bridge rest on the platforms.   While the two pairs of columns on the outside were attached to the module as shown above, the center pair was attached directly to the surface with E6000 adhesive as that area is on wood.

The plate on the bumper at the end of the station spur track was painted white and a black "X" decal was applied over the white background.  In this photo, the empty concrete footings for the foot bridge can be seen in the foreground.  I had intended to attach the foot bridge to the module but it fits so nicely just sitting in the footings, I now plan to have it removable for better access clean the tracks.

A bit of weathering


For weathering I use Bragdon's weathering powders in several different colors.  I use a small shorted bristle paint brush to work the power into the spots I want it to be applied and the larger brush for smoothing.

Here's the assembled scene with both the station and the foot bridge weathered.  The foot bridge got a bit more than the station building as I recall most of them I have seen in rural areas have had a deferred maintenance look to them.


The station area is now basically complete.  Later I will be adding some signs, people, and other details but for now I am going to move on to completing the river scenes.

Wednesday, June 18, 2014

Finishing the station scene - Part 1

With the station, the foot bridge, and the platforms all completed, it was time to bring it all together and finish the scene around the station.  They would all need to be properly mounted to the module.

As there is wood under the station, I mounted it with a pair of small flat head wood screws counter sunk into the base of the station.  I may cover this screw with the kiosk structure shown here or some other detail.
The platform on the station side of the track was attached to the module with the clear E6000 adhesive.

Before mounting the station, the tracks were painted and ballasted. Also a bumper made from scraps of rail and brass strip was installed at the end of the stub track.

It is important for the two platforms to be equal in height and their tops parallel to each other for the foot bridge to sit correctly.  I used a straight scrap of wood to align them.  The terrain in the foreground had to be built up a bit to support the 2nd platform..

Here the foot bridge is temporarily set in place on the platforms and a pair of rail cars set on the tracks to double check alignment of the platforms.

While there is still more to do to fully finish this scene, it is great to see it coming together after so much work.

Monday, May 12, 2014

Painting the Green Max foot bridge


The same general color scheme that was used on the Green Max Station was used on this covered foot bridge.  Floquil Antique White for the walls and Oxide Red for the roofs were applied with an air brush.


There is a large amount of bracing that could have been painted as trim in a contrasting color but I decided not to thinking the railroad would not have done this due to cost.  I also plan to weather this structure and that should bring out the detail.

There are two protection plates that come with this kit.  I believe the purpose of these is to protect the structure itself from being hit by the electric wire.

These were brush painted Model Master Gull Gray before being installed on the structure.


The instructions seem to show these parts just being glued to the frame of the structure but on the front of the box the drawing shows them being suspended by wires and not actually touching the structure.  What I did to simulate this look was to make spacers from scraps of the column material and .060 x .020 styrene.  This was then glued to the bottom of the floor and a small space between the protection plate and the structure.

Before attaching the roofs, I brush painted the stairs with Floquil Concrete.  I only went about half way up the stairs as that is all that is going to show when the roof is on.

I've noticed recently that Testors has discontinued the entire Floquil Railroad Colors line so I'm going to have to find an alternative to their concrete colored paints that I've been using for many years.

Wednesday, May 7, 2014

Building the Green Max foot bridge


As April ended and May began, we had a bit of a heat wave in the Bay Area with the temperatures reaching about 90 degrees F for a couple of days.  When I built the train room in the garage last year I was quite concerned about keeping the temperatures as cool as possible without the use of an air conditioner.  I had added attic ventilation to the garage and of course insulated the walls and ceiling.  During the cooler months, it was hard to get the room warmed up with a small electric heater so I added a damper to control the ventilation and that helped some.  I am generally OK if the temperature is between 60 and 80 degrees.  With the recent hot weather, the train room got it's first real test of keeping cool and I am happy with the results.

With the train room being the most comfortable place to be, and the need to finish many little projects on the Hot Springs Junction module, I pulled out a kit that I have been looking forward to starting.  Green Max kit # 17, the covered foot bridge.

Bridges like this were at one time quite common in Japan and I have clear memories of using them on my first couple of trips.  As things have become more modernized with escalators and elevators becoming standard, this older type of bridge is disappearing.


I assembled the structure as directed except for the support columns.   The support columns that came with the kit are meant to be resting on the same level as the stairs but I needed to have them extend to the ground level so I made new longer ones from Plastruct styrene columns and the cross bracing from the kit.

I planned to have three pairs of columns with the center pair being right in the center of the structure and between the two tracks.  At the center of the bridge, there is a floor brace that is about .040  x .040 in size.  By notching the tops of this pair of columns, the top of the columns fit right over the brace.

Another .040 x .060 brace was added at the top of each column just below the notch.  I also added an .040 x .040 floor brace at both ends and notched the other two pairs of column tops.

Here is the assembled bridge ready for paint.  A short section of angle on the inside corners and a bit of sheet styrene to the inside of the outer walls where the sections meet were added for strength.  These won't show after the roof is put on.

The roof sections will be painted separately then attached to the structure later.

Tuesday, October 1, 2013

New look for Green Max kits.

On this most recent trip to Japan in July I did get to do some hobby shopping and of course I had some Green Max items on my list.

I had seen this new apartment building on the internet and was able to pick one up at TamTam for about 2200 yen.

This new building seems like quite a departure from the traditional Green Max building kits but they did do a great job on it.


As I shopped I noticed that there were almost no Green Max kits left on the selves in the familiar boxes with the drawing on the front and the instructions on the back.  The new boxes are standardized green with a sticker indicating which kit it is and with most having a new part number.

As an example, here are the old and new wall and gate kits.  The contents are the same, just new boxes and part numbers.  And there're still made in Japan.

Some of the smaller kits are now not in a box at all but instead are in a hanging bag type of package.


I am not sure when this change started but I think the first kit I purchased that was not in the older style box were the modular building kits and that was sometime in 2010.  I'm sure the reason they are doing this is cost.  Fewer boxes, just a few standardized sizes and different stickers for different models.

I had scanned many of the boxes of my kits as I built them and I've started a new page called Classic Green Max boxes if you want to look back at those.

Monday, August 5, 2013

Finishing the Green Max stores

One of the mini-projects that has been going on for a long time is the block of Green Max stores just to the left of the arcade entrance.

When I left off on this project more than a year ago the Dry Cleaners with interior details and lighting was done and I had started a Book Store that would also be detailed and lighted.

For the Book Store interior I printed a floor similar to how I had done with the dry cleaners then added a couple of book cases, a counter with cash register, and a couple of figures.  I also printed some book cases on the interior walls and added lighting similar to the Dry Cleaners.

The tall building I am using is from Green Max kit 46-6.  I gave it a base coat of Floquil Oxide Red with an airbrush then hand painted all the details.  With all the windows that this building has that took a while.

The store fronts on these taller Green Max building kits are the same size and interchangeable with the ones in the set of small shops.  I used one that had two doors so one could be the lobby of the upper floors and the other for a celluar phone store on the ground floor.

Here is the completed block of Green Max stores,mounted on their styrene base.  I have put labels under each one showing what they are.  Some of them may be familiar from other posts. This scene is now ready to be added to the module.


This is only one of several long uncompleted projects related to these modules which I hope to complete in the near future.